Alright, let’s talk. Buying a diamond ring. Doesn’t that just sound…complicated? Stressful, even? Like walking into a place where everyone seems to know the rules except for you, and frankly, you’re pretty sure those rules aren’t exactly stacked in your favor.
Look, I get it. I’m Mehedi, the lead content creator here at Aurelia, but for the first ten years of my career, I was deep inside the diamond industry. I was on the wholesale side, the manufacturing side. I saw everything – how diamonds move, where the markups happen, and honestly?
I saw firsthand how confusing the whole process was for people just looking to celebrate a big life moment. I saw folks overpay, get steered towards stones that weren’t right for them, and just feel utterly lost.
It honestly bugged me. So, after seeing just how much knowledge wasn’t making it to the everyday buyer, I switched sides. My mission now is simple: to be your advocate. To pull back the curtain, give you the straight scoop without the jargon or sales pressure, and make sure you walk away feeling confident, excited, and like you got real value.
That’s why I put together this guide on how to buy a diamond ring. I’m going to share everything I learned from being on the inside – the simple truths, the sneaky tricks to avoid, and the absolutely essential steps to picking out a diamond and a setting that you (or your partner!) will absolutely love, all while making a smart financial decision.

By the time you finish reading this, you won’t feel lost anymore. You’ll feel empowered. You’ll know exactly what to look for, where to find the best options, and most importantly, how to avoid paying for things that don’t add real beauty or value. Ready to cut through the confusion? Let’s dive in.
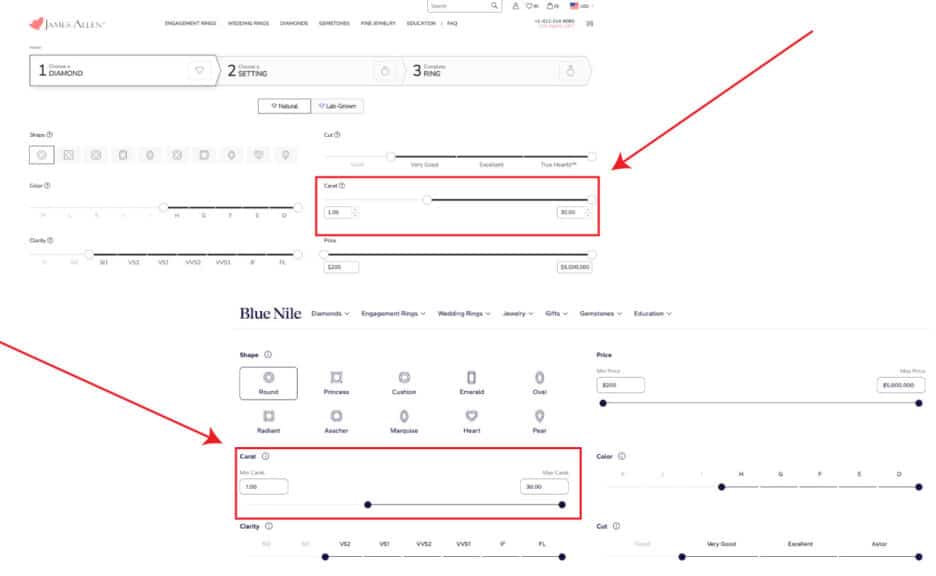
Step 1: Starting with Sparkle – Choosing Your Diamond Shape
Alright, let’s get into it. First things first, forget everything you think you should get in a diamond. This ring is about celebrating your story, your style. So, the very first concrete step? What shape speaks to you (or your partner)?
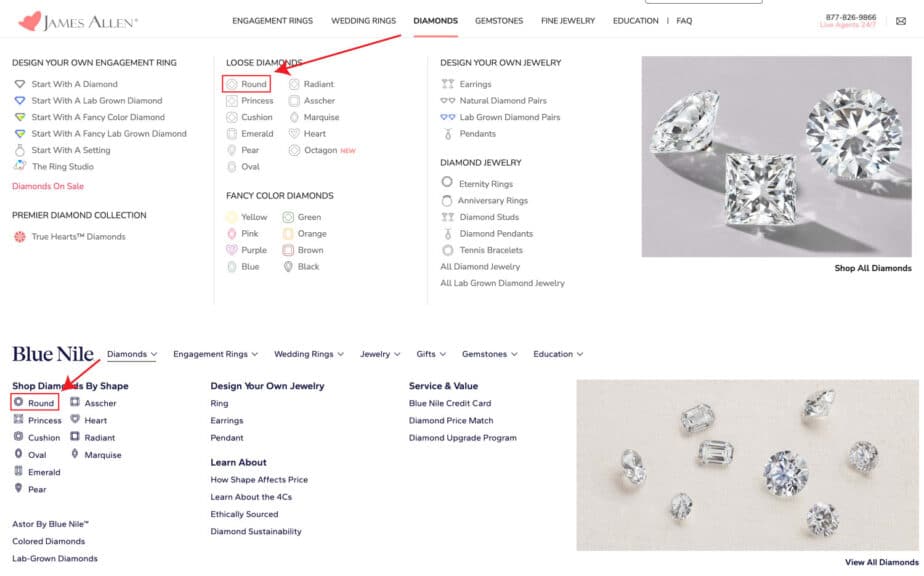
Look, out of all the diamonds sold, a staggering 75% or even higher are Round brilliants. They’ve been the classic for generations for a good reason: cut correctly, they return an incredible amount of light, giving you maximum sparkle – what we call brilliance, fire, and scintillation. Pure, unadulterated flash.
But honestly, there’s a whole world of beautiful shapes out there, often called “fancy shapes”: elegant ovals, vintage-inspired cushions, modern princesses, sharp emerald cuts, pears, marquises… the list goes on. Choosing the shape is purely personal preference. There’s no inherent “better” shape aesthetically, just the one you connect with emotionally and visually.
But here’s where my time on the inside comes in handy: that shape preference does have real consequences down the line for things like how much sparkle you can expect (fancy shapes require more nuanced cut evaluation, as we’ll discuss!), what color grades might look best (some shapes show color more easily than others), and significantly, the price tag per carat.
The big differentiator in price per carat is often the demand and the rough diamond yield. Round diamonds, because of that massive popularity and the skill required to cut them for maximum brilliance from a rough stone, tend to be the most expensive per carat.
My friends on the wholesale side always saw the demand for rounds keeping those prices notably higher compared to many fancy shapes cut from the same rough material.
On the flip side, many fancy shapes can offer incredible value and often give you a visually “larger” look for the same carat weight. This is called “spread” – essentially how large the diamond’s surface area appears from the top view.
An Oval or a Marquise, for instance, typically has a greater length compared to a Round of the same weight, making it appear bigger on the finger.
Here’s a quick look at how popular shapes stack up in general terms. Keep in mind prices vary wildly based on the other Cs, but this shows a typical trend you’d see comparing similar quality stones:
| Diamond Shape | Typical Popularity | General Price (vs. Round) | Typical Spread (vs. Round of Same Carat) |
| Round | ~75%+ | Base (Most Expensive) | Standard |
| Oval | High (Increasing) | Often 10-30% Less | Can appear 10-15% Larger |
| Princess | Moderate | Often 20-40% Less | Can appear 5-10% Smaller (due to depth) |
| Cushion | High | Often 10-25% Less | Similar or Slightly Smaller |
| Emerald | Moderate | Often 20-35% Less | Can appear Larger (due to table size) |
| Pear | Moderate | Often 15-30% Less | Can appear Larger (due to length) |
| Asscher | Lower | Often 20-35% Less | Similar or Slightly Smaller |
| Marquise | Lower | Often 25-40% Less | Can appear 15-20% Larger |
(Note: The percentages are illustrative averages and can fluctuate based on market conditions, specific cutting proportions, and retailer.)
Picking your shape first is like choosing the cornerstone of your ring’s design. It gives you that crucial starting point and influences the parameters you’ll look for when selecting the 4 Cs in the upcoming steps. Getting clear here helps focus your search right away.
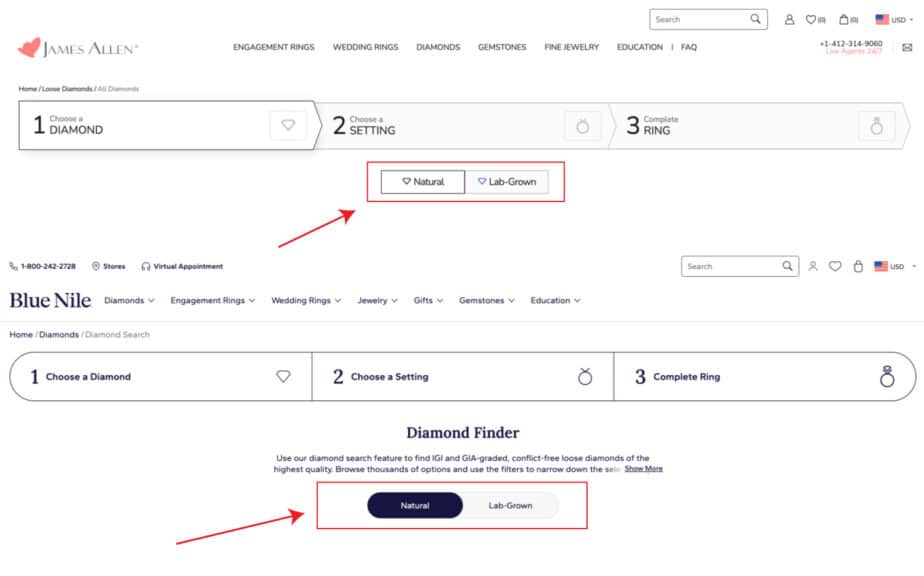
Diamond IQ Test: Natural or Lab-Grown?

Two identical diamonds: GIA Certified, 1.51ct, D Color, VVS1, Ideal Cut. One is natural ($16,240), the other is lab-grown ($1,970). Choose the diamond you like better and see if you can match it to its origin.
Step 2: Natural vs. Lab-Grown – The Big Decision (An Insider’s Take)
Here’s the deal. When I first got into this business on the wholesale and manufacturing side, talking about “diamonds” meant one thing and one thing only: diamonds that came out of the earth. Mined diamonds, formed over billions of years, a true miracle of nature. That was the standard, the entire market.
But then, slowly, technologies advanced. What started as a scientific curiosity – replicating nature’s process – began to produce gem-quality crystals. And suddenly, we have what the industry now calls “laboratory-grown diamonds” or “created diamonds.”
So, let’s clear up the biggest point of confusion right away, straight from the inside. Laboratory-grown diamonds are diamonds. Period. Chemically, physically, optically – they are identical to natural diamonds. A natural diamond is carbon arranged in a specific crystal structure. A lab-grown diamond? Same exact thing.
If you put a natural diamond and a lab-grown diamond of the same size and quality side-by-side, even I, with years of handling stones, cannot tell the difference with my naked eye. You need specialized equipment that can detect trace elements or growth patterns unique to how they were formed.
Think of it like ice from a glacier versus ice from your freezer. Both are H₂O. One took millennia to form in a natural process; the other was made quickly in a controlled environment. But at the end of the day, they’re both just ice.
How They’re Made (Briefly): The Billion-Year Process vs. The High-Tech Lab
Natural diamonds were born billions of years ago, deep within the Earth’s mantle, under unimaginable heat and pressure. They traveled to the surface through volcanic eruptions and lay hidden in rock formations until discovered through mining. This geological rarity is fundamental to their historical value.
Laboratory-grown diamonds, on the other hand, are produced in weeks, sometimes months, using incredibly advanced technology that mimics earth’s process:
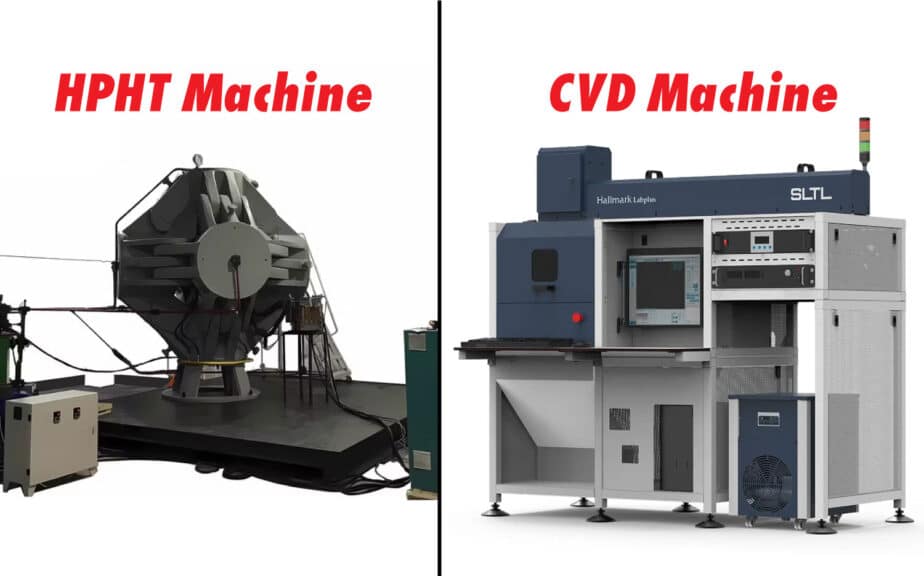
- High-Pressure, High-Temperature (HPHT): This is the older, more established method. It uses massive presses to recreate the intense pressure and temperature found in the earth, turning a carbon source (like graphite) into a diamond crystal seed within a metal solution. It’s literally forcing the diamond structure to grow quickly.
- Chemical Vapor Deposition (CVD): This method is more recent and gaining popularity, especially for certain types of gem-quality stones. It involves placing a thin diamond seed in a vacuum chamber and introducing carbon-rich gases (like methane). Microwaves or lasers break down the gas molecules, allowing the carbon atoms to rain down and crystallize layer by layer onto the seed, slowly “growing” the diamond upward.
Both methods produce real diamond crystal structures.
Grading: The Same Standards, With a Key Difference
Because they are real diamonds, lab-grown stones are evaluated using the exact same 4 Cs – Cut, Color, Clarity, and Carat weight – and graded by the same reputable labs you’ll rely on for natural diamonds (GIA and AGS both grade lab-grown diamonds, although sometimes through specific service lines).
BUT – and this is a crucial distinction – the grading report will explicitly state that the diamond is “Laboratory-Grown,” “Created,” or “Man-Made.” There will also usually be a laser inscription on the diamond’s girdle identifying it as laboratory-grown, often including the report number. This ensures full transparency about its origin. From my experience, the consistency of grading for lab-grown by GIA and AGS is as reliable as their grading for natural diamonds.
The Critical Divergence: Price and Value Trajectory
This is where the story of natural versus lab-grown diamonds drastically diverges, and it’s perhaps the most important thing for you to understand when you’re figuring out how to buy a diamond ring in today’s market. It all comes down to rarity versus scalability.
- Natural Diamond Value: The value of natural diamonds has historically been tied to their rarity. Finding large, high-quality crystals from the earth is genuinely difficult and requires massive investment in mining operations.
While diamond prices aren’t as simple as supply/demand (the market is highly managed), their value is influenced by geological scarcity and strong historical marketing that positioned them as symbols of enduring value and love – because they took eons to create and finding them is challenging.
Over decades, the price of comparable quality natural diamonds, while fluctuating, has generally held value or slowly increased, particularly for sought-after specs. However, let me be candid from the inside: buying a natural diamond ring should be primarily for its beauty, sentiment, and rarity, not strictly as a financial investment you expect to flip for a profit next year.
While some very rare natural stones might appreciate, a standard engagement ring stone typically will not retain its full retail value if you try to sell it later. The markup from wholesale to retail is just too significant. - Lab-Grown Diamond Value: This is where things get fascinating – and often misunderstood. Lab-grown diamonds are produced using technology. And what happens to the cost of technology over time? Think about flat-screen TVs, computers, or cell phones.
The technology gets more efficient, production scales up, and the cost per unit decreases. Rapidly. That’s exactly what has happened with lab-grown diamonds, and from what I’ve seen working with sources supplying retailers, it will likely continue to happen.
- In just a few years, the price of lab-grown diamonds has dropped significantly – we’ve seen prices plummet to anywhere from 50% to often 80% LESS than a natural diamond of comparable quality. [Based on current market price differences commonly observed across vendors].
- Because they aren’t limited by natural supply but by manufacturing capacity and innovation, there’s no inherent geological rarity driving up their price in the long term in the same way. As technology improves and more labs ramp up production, the cost per carat is likely to continue a downward trend.
- In just a few years, the price of lab-grown diamonds has dropped significantly – we’ve seen prices plummet to anywhere from 50% to often 80% LESS than a natural diamond of comparable quality. [Based on current market price differences commonly observed across vendors].
Here’s the real deal, and listen close: Anyone trying to sell you a lab-grown diamond as a strong investment is giving you seriously flawed information. While they offer incredible purchase value – you can get a much larger or higher quality diamond for your budget today – they lack the resale value of natural diamonds and are expected to decrease in price over time as production becomes cheaper.
Think of it more like buying a fantastic, high-tech piece of jewelry you love for what it is, not a store of value.
Blue Nile is one of the biggest and most recognized online jewelry retailers, offering an extensive and exclusive inventory. Their high-resolution images are improving and getting closer to the quality offered by James Allen, while their prices remain highly competitive. Right now, Blue Nile offers up to 30% savings on jewelry during a limited-time sale.
WHAT WE LOVE ABOUT THEM:
- 30-day no-questions-asked return policy, with a prepaid shipping label provided by Blue Nile.
- Lifetime warranty on all purchases.
- Free shipping on every order.
- Complimentary services every six months, including prong tightening, repolishing, rhodium plating, and cleaning.
- Insurance appraisal included with your purchase.
- One free resizing within the first year.
- High-quality images available for roughly half of their diamond selection.
- 24/7 customer service support.
- Full credit toward future upgrades, as long as the new item is at least double the value.
- Best-in-class order fulfillment process.
Ethics & Environment: More Nuance Than a Slogan
Beyond price, people are rightly thinking about where their diamonds come from.
- Natural Diamond Ethics: The term “conflict diamond” or “blood diamond” refers to stones mined in war zones and sold to finance civil wars. The industry established the Kimberley Process (KP) Certification Scheme to prevent these diamonds from entering the legitimate market.
From my perspective working within the traditional chain, the KP has been effective at drastically reducing the trade of conflict diamonds compared to the 1990s, by implementing a system of warranties and paper trails.
However, the KP has limitations – it primarily focuses on rebel groups financing conflict, not necessarily other critical issues like human rights abuses, child labor, or environmental standards at the mining sites themselves.
More responsible practices within the natural diamond industry go beyond KP, involving responsible sourcing protocols and positive impact initiatives in mining communities. Finding a reputable vendor committed to verifiable responsible sourcing is key here. - Lab-Grown Diamond Ethics/Environment: Lab-grown diamonds sidestep the issues associated with mining conflict and community impact, as they are produced in controlled environments. Their “origin” is the laboratory. This is a big plus for many buyers prioritizing a clean origin story.
However, the “environmental” argument is complex. Growing diamonds, especially via HPHT, requires significant energy, often electricity generated from fossil fuels. While some labs are moving towards using renewable energy, it’s important to look at the actual energy sources used, not just assume “lab” automatically means “green.” Learn more about cons of Lab Grown Diamond here.
The environmental impact is different from mining (no land disturbance, less water usage potentially) but isn’t necessarily zero or always “better” without looking at the power source.
Making YOUR Decision: Which Path is Right?
So, where does that leave you as you figure out how to buy a diamond ring?
There’s no single right answer; it comes down entirely to your priorities and values.
- Choose Natural If: You value geological rarity and billions of years of natural history. You prefer the traditional symbol of a mined stone. You understand its historical value holding capacity (though with realistic expectations about retail markup). You can verify its origin through a reputable vendor’s responsible sourcing policies.
- Choose Lab-Grown If: You want maximum visual size or quality for your budget. You prioritize a guaranteed conflict-free origin from a controlled environment. You view the purchase purely for its beauty and sentimental value now, accepting it’s unlikely to hold resale value.
Both options, sourced from reputable vendors, offer stunning beauty certified by top labs. Your choice depends on what matters most in your personal story and priorities.
Step 3: The Ruler of Radiance – Understanding Diamond Cut Quality (Especially for Fancy Shapes)
Trust me on this, if there’s one “C” you need to put at the top of your list when figuring out how to buy a diamond ring, it’s Cut. Not Color, not Clarity, not even Carat weight, though they all matter. Cut is everything when it comes to that dazzling sparkle – the brilliance (white light reflection), fire (color flashes), and scintillation (the sparkle you see when the diamond moves).
I’ve spent years looking at loose diamonds and finished rings on the wholesale and retail side. And I’ll tell you, I’ve seen natural diamonds with an H color and VS2 clarity outshine a D color, VVS1 clarity diamond of the same size, simply because the first one had a superior cut.
I’ve also seen perfectly colorless, flawless stones look dead and dull because someone botched the cutting. A diamond is like a miniature light-bending sculpture; the cut determines how well it captures and returns light.
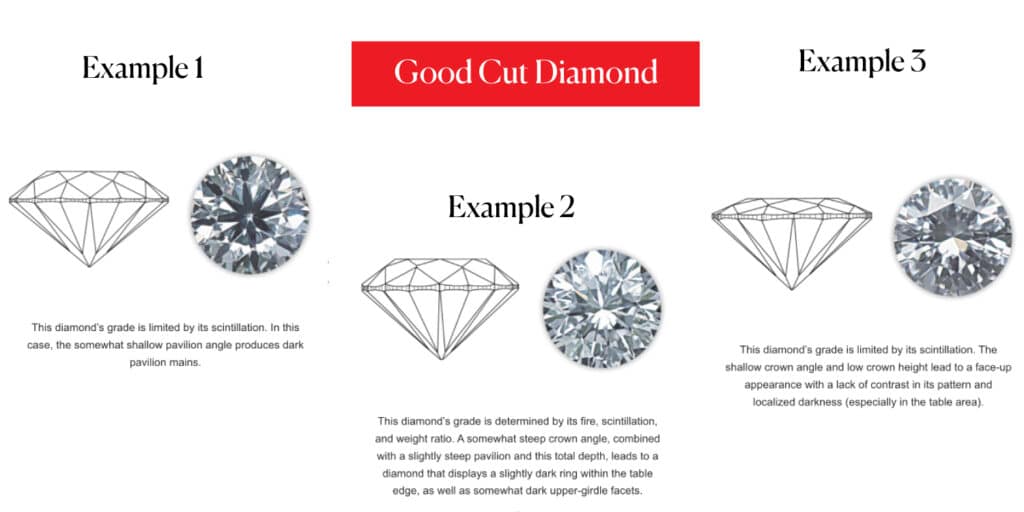
The goal of a good cut is to maximize light return through the top of the diamond. If a diamond is cut too shallow or too deep, light “leaks” out the bottom or sides, and it won’t sparkle like it should.
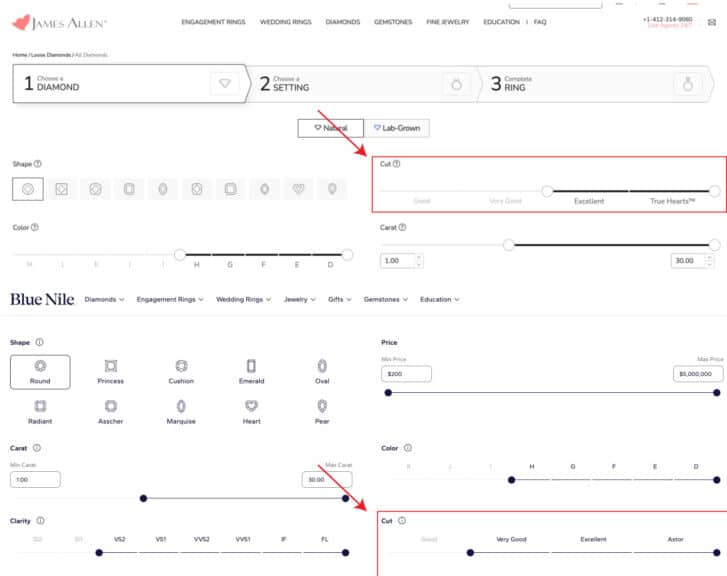
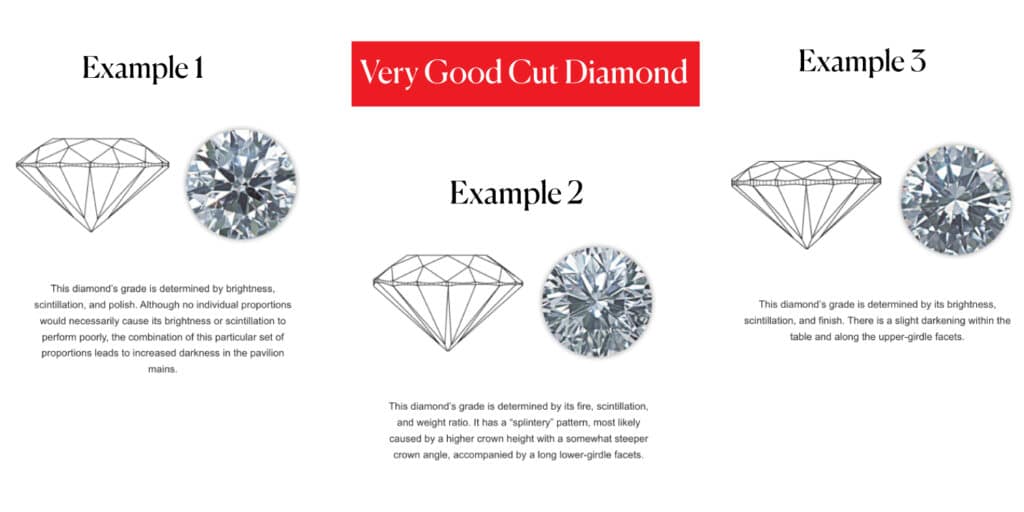
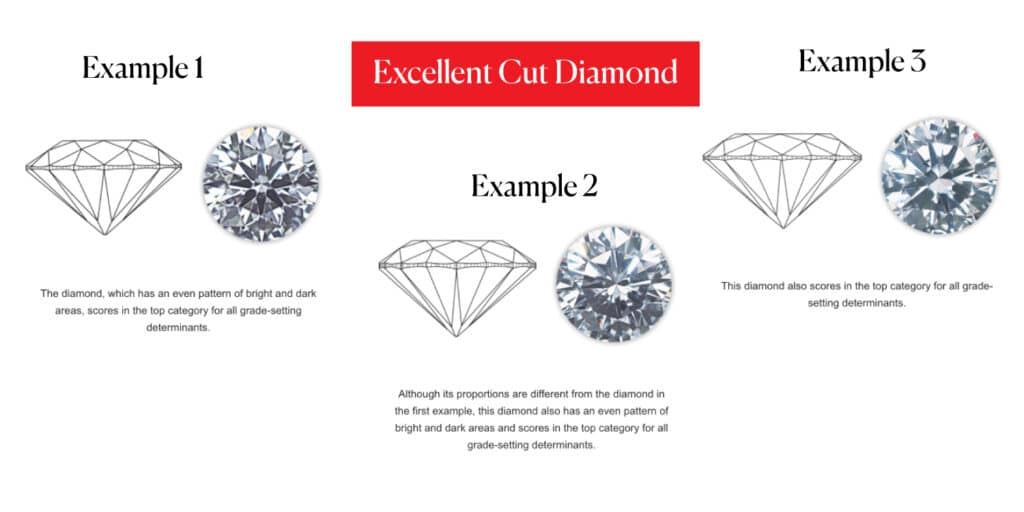
For Round Brilliant Cut diamonds, which we know are the most popular (>75% of sales!), the grading labs like GIA and AGS have spent decades perfecting their cut grading systems because the geometry is highly predictable for optimal light return.
- Stick to Top Grades: My strongest advice? For Round Brilliant diamonds, only look for GIA Excellent or AGS Ideal cut grades. Don’t settle for Very Good, Good, or Fair if maximizing sparkle is your goal.
- By the Numbers: Based on GIA data, typically only about the top 10-15% of round diamonds submitted receive an Excellent cut grade. AGS is even stricter with their Ideal grade using light performance analysis – probably only the top 5%. These top-tier grades mean the diamond’s proportions, symmetry, and polish are all aligned to give you maximum sparkle.
- Practical Impact: Prioritizing an Excellent/Ideal cut round guarantees you’re getting a diamond with proven sparkle performance, ensuring maximum beauty for your budget regardless of the other Diamond 4C’s.
But Here’s Where Most Guides Fall Short: Fancy Shapes and The Cut Dilemma
This is the content gap area that drives me crazy in standard guides. They tell you about cut grades for rounds, and maybe just add a line like “cut grades are less reliable for fancy shapes.” That’s true, but not helpful!
You’re looking at an Oval or a Cushion or a Pear, and the certificate just says ‘Good’ or ‘Very Good,’ even if it looks amazing? Or it says ‘Very Good’ and it looks…meh? How do you figure out which is which?
The reason GIA’s standard cut grade is less reliable for fancy shapes is because their proportions and facet arrangements are much more varied than rounds. Predicting light performance perfectly from measurements alone is complex. So, relying only on that single cut grade word on the certificate for a fancy shape? That’s a risk you don’t want to take.
From my time seeing thousands of diamonds come through the shop, the key to evaluating fancy shape cut isn’t the certificate grade – it’s visual inspection. You HAVE to see the diamond, ideally in a video (which is why online vendors are game-changers here!).
Here’s what I trained my eyes to look for, and what you should look for when you’re using those high-quality online videos:
- The Dreaded Bow-Tie: This is the most common cut issue in elongated fancy shapes like Ovals, Pears, and Marquises, but also sometimes seen in Cushions and Radiants. It’s a dark, bow-tie shaped area across the center of the diamond.
It’s essentially a lack of light reflection back to your eye because of the cutting proportions. A slight bow-tie is normal in many shapes and can add a nice contrast, but a dominant, black, or large bow-tie will significantly detract from the diamond’s beauty and sparkle. - Windowing or Fish-Eye Effect: This happens when a diamond is cut too shallow, or sometimes too deep in the pavilion angle (the lower part of the diamond). When you look down at the stone, part of it can look clear or see-through, like a window.
You might even be able to see the ring setting through the diamond! A severe window, especially around the outer edge (a “fish-eye”), means light is leaking out the back instead of bouncing up to your eye. - Symmetry of Sparkle/Darkness: Even without a classic bow-tie or window, a poorly cut fancy shape can look uneven. One side might sparkle more than the other, or you might see weird patches of darkness (extinction) or excessive brightness without color (brilliance) in awkward places, indicating light leakage due to poor symmetry or proportions.
Your Action Plan for Fancy Shape Cut: Look with Your Own Eyes
Since the grade alone isn’t sufficient, here’s how you smartly pick a great fancy shape diamond based on its cut:
- Use Filters as a Starting Point: Still use the basic Cut filters available (Excellent/Ideal if they exist, or Very Good/Good) just to narrow the vast selection initially.
- Prioritize High-Quality Videos/Images: Only consider diamonds where you can see a clear, high-resolution 360-degree video. This is non-negotiable for fancy shapes.
- Critically Evaluate the Visuals: Spend time looking at each potential diamond in its video. Rotate it slowly, stop it, zoom in. Look for those visual killers: the bow-tie, windowing, or uneven patterns. Compare a few side-by-side (again, top online sites let you do this easily). Which one is truly dazzling with light and doesn’t have major dark or see-through areas?
- Consider Professional Opinion: If you’re torn between a few finalists, or you’re just not sure about what you’re seeing, many online vendors (including the ones I recommend) offer a free consultation with a gemologist.
They can look at the same videos and give you their objective assessment. And hey, I offer my own expert opinion service because I know how valuable a second set of trained eyes can be!
James Allen is a top leader in online diamond sales, offering cutting-edge imaging technology that lets you inspect diamonds as if you were using a jeweler's loupe. With the largest exclusive selection of loose diamonds available online and excellent pricing, they also boast one of the finest collections of lab-created diamonds on the market. They currently run a 25% discount on selected lab-grown diamonds!
WHAT WE LOVE ABOUT THEM:
- 30-day no-questions-asked return policy, with a prepaid shipping label provided by James Allen.
- Lifetime warranty on all purchases.
- Free international shipping.
- Complimentary prong tightening, repolishing, rhodium plating, and cleaning every six months.
- Insurance appraisals included with purchases.
- One free resizing within 60 days of purchase.
- Free ring inscriptions available.
- Best-in-class high-quality imagery for every diamond in stock.
- 24/7 customer support.
- Premium, best-in-class packaging.
The Bottom Line on Cut
Whether you choose a Round or a fancy shape, cut is the most impactful factor on your diamond’s beauty and presence. For rounds, trust the GIA/AGS top grades. For fancy shapes, become a savvy visual inspector – the online videos are your best friend and frankly, a resource I never had like this back when I started!
Getting the cut right means getting a diamond that truly sparkles and performs, giving you the most bang for your buck in terms of beauty.
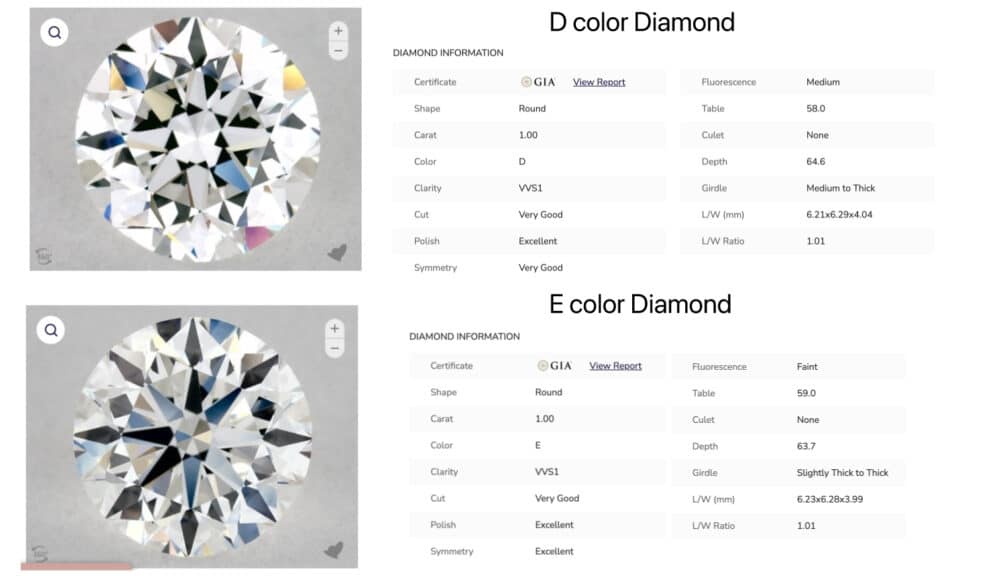
Step 4: Finding the “Sweet Spot” Color Grade
Let’s not mince words. Unless you are a gemologist holding a diamond loose on a white background under specific lighting (like we used to do in the lab!), paying top dollar for a completely colorless “D” or “E” color diamond is often, from my perspective, throwing money away.
Why? Because diamond color, especially in the near-colorless to faint yellow range, is often very subtle and incredibly difficult for the untrained eye – which is most eyes, frankly! – to detect, especially once that diamond is set in a ring.
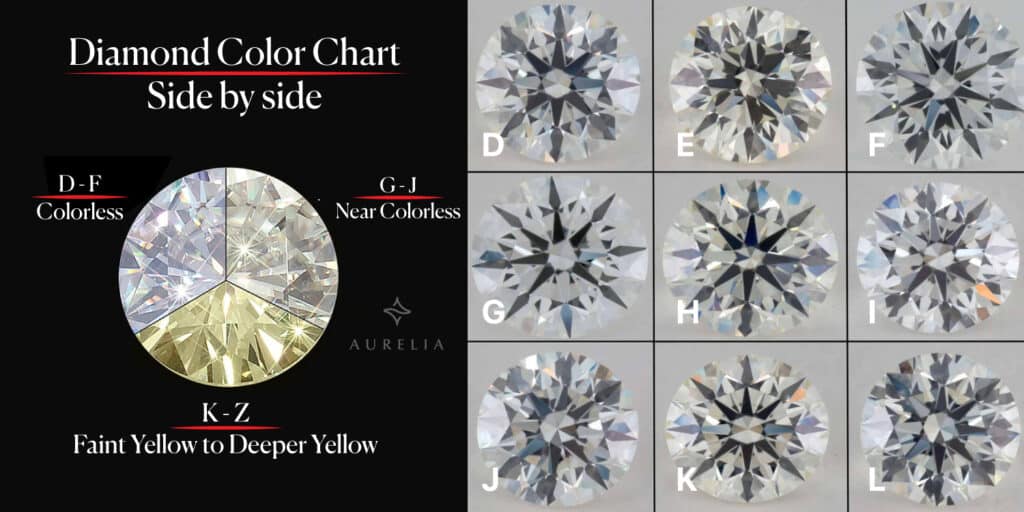
The GIA Color Scale runs from D (absolutely colorless, the rarest and most expensive) down to Z (light yellow or brown).
- D-F: Colorless. The creme de la creme, commanded by perfectionists with significant budgets. Visually stunning, but the difference from the grades below is hard to spot face-up.
- G-J: Near-Colorless. Diamonds in this range do have trace amounts of color, but it’s usually not visible to the naked eye when the diamond is mounted. This is the champion value range for many buyers.
- K-M: Faint Yellow. Color is typically visible to the naked eye, especially from the side.
- N-R: Very Light Yellow. Visible yellow or brown tint.
- S-Z: Light Yellow. Noticeable yellow or brown color.
Where the Value Is: The Near-Colorless Secret
Here’s my insider secret, and where you can unlock significant savings: focus your search on the G to I color range. Sometimes even a J color can work beautifully, depending on the diamond’s shape and the setting.
Why this range?
- Visually White, Seriously Cheaper: Diamonds graded G, H, I, or even J typically appear colorless to the naked eye when they are viewed face-up in a ring setting. You might be able to detect a tiny hint of color if you hold the diamond upside down against a white background, but nobody looks at an engagement ring like that in everyday life!
- Significant Price Difference: The price jumps dramatically from the Near-Colorless range (G-J) to the Colorless range (D-F). Based on industry price sheets, moving from an H to a G color can add 10-15% to the price for a 1-carat diamond, while jumping from a G to an E color can add another 20-30% or more! You are paying thousands extra for a distinction only noticeable in a lab environment.
- Focus Your Budget: By choosing a G, H, I, or J color that looks white to you, you free up significant budget to invest in something that does dramatically impact beauty, like the Cut quality we just talked about, or potentially allowing you to afford a slightly larger Carat weight or a more elaborate setting.
How Your Setting Metal Influences Color Choice
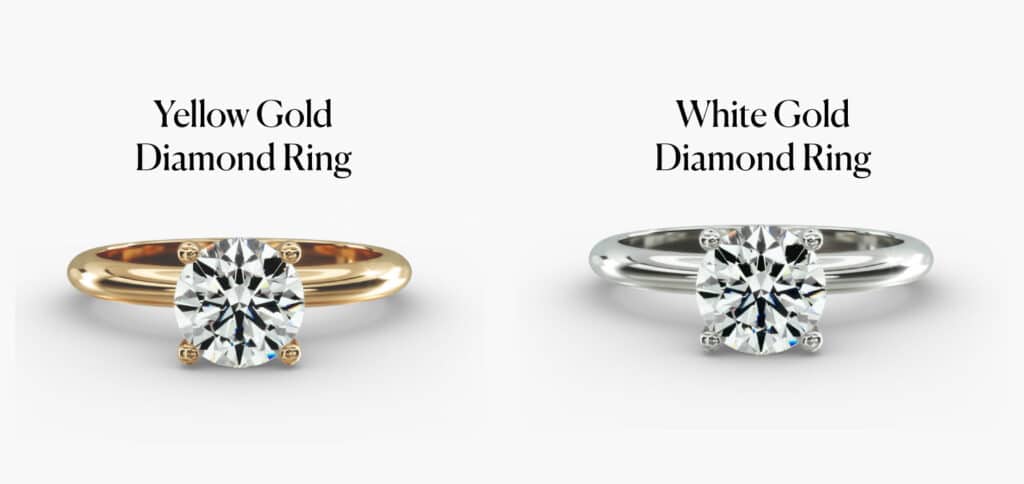
Your ring’s metal setting plays a surprising role in how white your diamond looks.
- White Gold or Platinum Settings: These white metals emphasize any color present in the diamond. If you choose one of these, sticking to a G or H color is generally safest to ensure it looks completely colorless against the bright white metal. An I or J might show a slight warmth if you’re very color-sensitive, though often still perfectly acceptable.
- Yellow Gold Settings: This is a fantastic opportunity for value! A yellow gold setting makes the diamond’s natural yellowish tints blend in beautifully. You can often comfortably drop down to an I or even J color (sometimes even a K color in a deep yellow setting!) and it will still look wonderfully white against the metal. The setting masks the slight warmth of the diamond.
- Rose Gold Settings: Similar to yellow gold, the pinkish hue of rose gold is also very forgiving of a diamond’s natural warmth. I and J colors are excellent choices here for value.
Shape Matters, Too
Some diamond shapes are more efficient at reflecting light (like the Round Brilliant) and therefore hide color better. Others, like step cuts (Emerald, Asscher) which have large, open facets you look down into, or shapes with points (Pear, Marquise) where color can sometimes collect at the tips, tend to show body color more readily.
This means for these shapes, you might want to target a slightly higher color grade (like staying within the G-I range instead of dipping into J) compared to a Round Brilliant of the same carat weight.
The Takeaway: Don’t get fixated on a letter grade from D-F. Instead, look at diamonds (ideally via those crucial high-res videos we discussed) in the G-J range within your desired setting metal. Find a stone that looks white and beautiful to you when viewed face-up. That’s the “sweet spot” for color that gives you incredible visual appeal without overspending on an invisible trait.
Step 5: Eye-Cleanliness is Key – Decoding Diamond Clarity
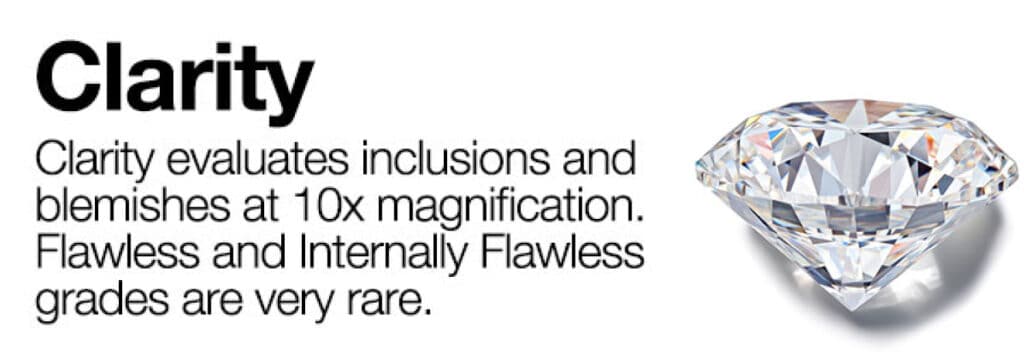
Alright, Clarity. This is another place where most guides just list a bunch of confusing grades and terms like “inclusions” and “blemishes.” But here’s another bit of blunt, insider truth: My philosophy? Find the cheapest diamond that’s eye-clean. PERIOD.
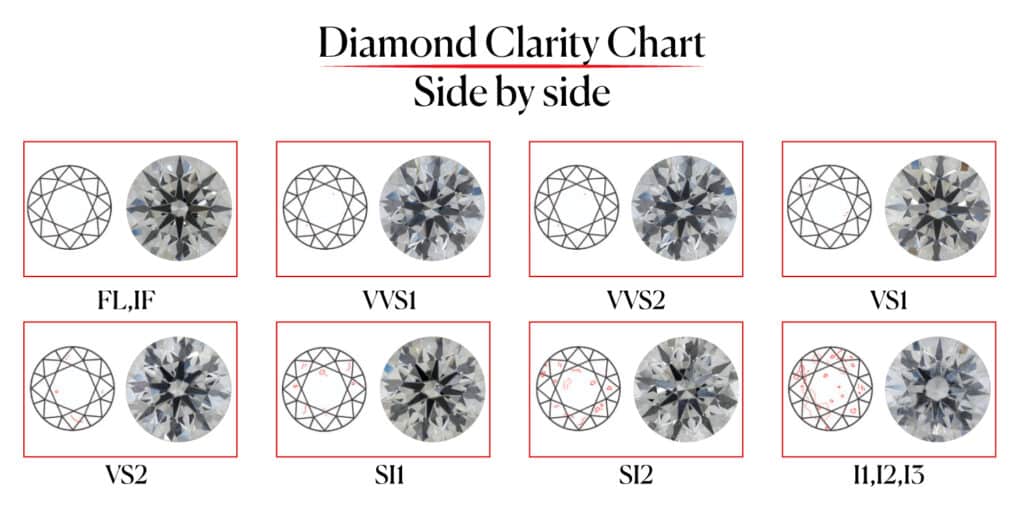
The GIA Clarity Scale goes from Flawless (FL, meaning no inclusions or blemishes visible under 10x magnification – incredibly rare and expensive) down through various grades of Very Very Slightly Included (VVS1, VVS2), Very Slightly Included (VS1, VS2), Slightly Included (SI1, SI2), and Included (I1, I2, I3, where inclusions are typically visible to the naked eye).
- FL (Flawless): No inclusions or blemishes under 10x magnification. Exceedingly rare.
- IF (Internally Flawless): No inclusions under 10x mag, only minor blemishes. Very rare.
- VVS1, VVS2 (Very Very Slightly Included): Inclusions are extremely difficult to see even under 10x mag. Tiny, tiny stuff.
- VS1, VS2 (Very Slightly Included): Inclusions are difficult to see under 10x mag. This is where the “sweet spot” often begins.
- SI1, SI2 (Slightly Included): Inclusions are noticeable under 10x mag. Some diamonds in this range can be eye-clean, offering great value.
- I1, I2, I3 (Included): Inclusions are typically visible to the naked eye.
What “Eye-Clean” Really Means in the Real World
Forget the grades for a second and focus on the practical reality: Does the diamond look perfect when you just look at it, say, on someone’s hand across the table? Can you see any flaws – little dark spots, cloudy areas, lines – without needing a magnifying glass?
That’s “eye-clean.”
From my years handling stones under bright office lights, softer retail lighting, and even just holding them up to the sun, I can tell you:
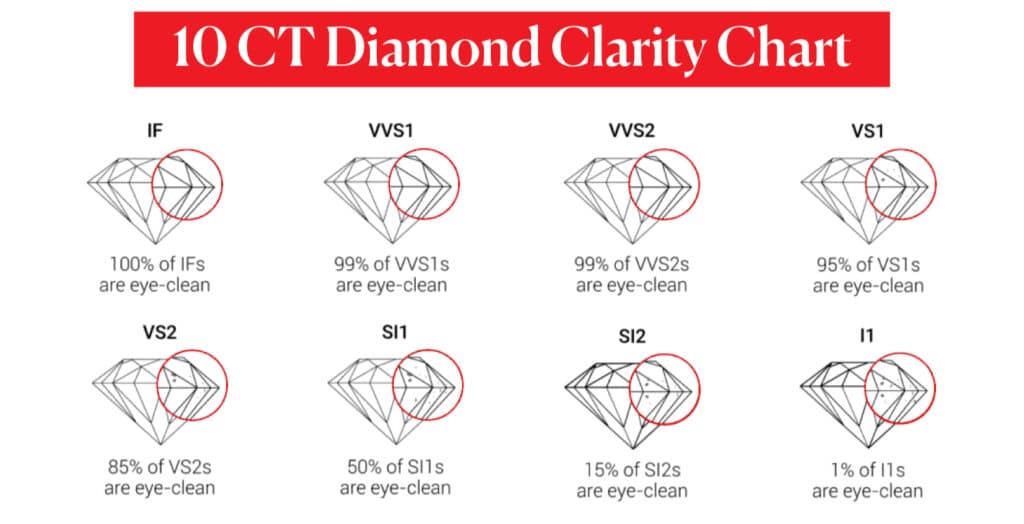
- Beyond SI1/SI2 is usually safe: Grades like FL, IF, VVS1, VVS2, VS1, and VS2 are almost always eye-clean. The inclusions in these grades are so small, they’re truly only visible under magnification by a trained professional. You are essentially paying a massive premium for microscopic perfection.
- VS1/VS2: The Go-To Zone: For most people, VS1 and VS2 are the ideal value clarity grades. They offer a very high chance of being eye-clean, but without the sticker shock of the VVS or Flawless categories. Based on reviewing thousands of reports and videos, I’d say well over 95% of VS2s are eye-clean.
- SI1/SI2: Value Hunting Territory (Use Caution): This is where you can potentially find screaming deals on eye-clean diamonds, but you must visually verify. Some SI1 or even SI2 diamonds have inclusions that are positioned where light reflection hides them, or they might be white and blend in. Other SI1/SI2 stones have black carbon spots right under the main table that are obvious. There’s much more variability here, so reliance on that high-resolution video is absolutely crucial. It might be fewer than 20-30% of SI2s that are truly eye-clean to an untrained eye, but those you find are incredible value.
(Note: This variation within SI grades is where you save – being willing to look critically at more stones pays off!)
Why Pay for Invisible?
Let’s talk about that premium. Moving from a VS2 that is eye-clean up to a VVS1 or even Flawless diamond can easily double or triple the price of the diamond, sometimes adding many thousands of dollars. Think about it: You’re paying this huge extra cost for clarity grades where the difference can only be seen with 10x magnification by a trained eye. Is that a wise place to spend your budget when the person receiving or wearing the ring will only ever see it with their naked eye?
My recommendation is firmly rooted in value: Target eye-cleanliness, nothing more, nothing less.
(Note: Include an image showing a diamond that is VS2 or SI1 and truly looks “eye-clean” to the naked eye next to an image showing a diamond (likely I1 or lower) with inclusions that are clearly visible without magnification. Annotate if needed to point out visible inclusions.)
How to Be Sure Your Diamond is Eye-Clean Using Online Tools
This is another huge advantage of using top online retailers like James Allen or Blue Nile, going back to Step 3. They provide high-resolution videos, sometimes magnified up to 40x, that you can spin around.
- Become the Inspector: Use those videos! Spin the diamond, look at it from the top (face-up), try tilting it slightly. Zoom in (but remember you’re zooming past 10x mag here, so tiny things you see zoomed in likely won’t be visible without magnification in person). Are there any dark spots, cloudy areas, or lines that stand out to you as you watch it?
- Inclusion Location Matters: Where an inclusion is located makes a big difference. An inclusion near the edge, under a prong, or low down near the pavilion might be hidden by the setting. An inclusion dead center under the table? Much more likely to be visible. Check the clarity plot diagram on the certificate to see where major inclusions are mapped out.
- View in Different “Lighting”: Sometimes online tools let you change lighting. See how the inclusions appear under different views, as they can be more noticeable or less noticeable depending on the light and angle.
ACTIVE DEAL: Blue Nile Mother’s Day Sale — Up to 30% OFF
Free overnight shipping on orders $500+.
Free 30-day returns. Lifetime warranty.
Also: New email subscribers get $50 off their first order of $500+.
Looking for more? Check out the Clear The Vault event.
*Exclusions may apply. See Blue Nile for complete details.
Ultimately, you are the best judge of eye-cleanliness for your needs when you use these tools effectively. Don’t be afraid to trust your eyes guided by this principle.
The Clarity Cliff Notes: Clarity is important for beauty, but only up to the point where inclusions are no longer visible to the naked eye in normal viewing conditions. Chasing Flawless grades is a fast way to blow your budget with zero visual payoff compared to a well-chosen, eye-clean VS1 or VS2 (or even lucky SI). Find the cheapest stone that looks perfect when you view its video.
Step 6: Getting the Right Size – Carat Weight & Spread
Everyone asks “how big?” but having worked with diamonds for years, I can tell you the real question is, “how does it look?”. That might sound like semantics, but it’s key to getting value when you buy a diamond ring.
See, “Carat” isn’t a measure of size; it’s a measure of weight. One metric carat equals 200 milligrams, or 0.2 grams. It’s like flour – you buy a bag by weight (kilograms or pounds), but what you care about is often the volume (how many cups you get for baking).
The Important Concept: Spread
What matters visually is how big the diamond appears when you’re looking down at it in its setting – its face-up size, or what we call “spread.”
Think about it: You could have two diamonds that both weigh exactly 1.00 carat. But if one is cut poorly – maybe it’s too deep and hiding a lot of its weight in the base, or it’s too shallow and has that “windowing” effect we talked about in Cut – it can look smaller from the top than another diamond of the same weight that was cut to optimal proportions, which maximizes its diameter or face-up area.
- Example: A beautifully cut 1.00-carat Round Brilliant diamond might have a diameter of approximately 6.4 mm. A poorly cut 1.00-carat Round might only be 6.0 mm in diameter. That 0.4 mm might sound tiny, but visually on a finger, it’s noticeable!
Cut and Shape Matter More Than You Think
As you saw in Step 3, Cut quality isn’t just about sparkle; it directly impacts the diamond’s spread. A well-cut diamond is proportioned to give excellent light return and often a good face-up size for its weight. This is another reason why prioritizing Cut is non-negotiable!
Additionally, as we touched on in Step 1, shape also influences spread significantly. Some shapes are inherently cut deeper to optimize sparkle (like the Princess cut which carries a good chunk of weight in its pavilion), while others are cut more shallowly with length, giving a bigger visual appearance for their weight (like Ovals or Marquises).
Here are some average diameter or face-up measurements for popular shapes at key carat weights. Remember: these are just averages for well-cut stones. Poor cut can make these numbers smaller!
| Diamond Shape | Approx. Avg. Face-Up Size (Diameter or L x W) at 0.50 ct | Approx. Avg. Face-Up Size (Diameter or L x W) at 1.00 ct | Approx. Avg. Face-Up Size (Diameter or L x W) at 1.50 ct | Approx. Avg. Face-Up Size (Diameter or L x W) at 2.00 ct |
| Round | ~5.1 mm diameter | ~6.4 mm diameter | ~7.3 mm diameter | ~8.2 mm diameter |
| Oval | ~6.5 x 4.3 mm | ~8.2 x 5.4 mm | ~9.4 x 6.2 mm | ~10.5 x 7.0 mm |
| Princess | ~4.5 x 4.5 mm | ~5.5 x 5.5 mm | ~6.4 x 6.4 mm | ~7.0 x 7.0 mm |
| Cushion | ~5.0 x 5.0 mm | ~6.5 x 6.5 mm | ~7.5 x 7.5 mm | ~8.0 x 8.0 mm |
| Emerald | ~5.5 x 3.8 mm | ~7.0 x 5.0 mm | ~8.5 x 6.0 mm | ~9.5 x 7.0 mm |
| Pear | ~6.8 x 4.5 mm | ~8.5 x 5.7 mm | ~9.8 x 6.5 mm | ~11.0 x 7.5 mm |
(Note: These are very general averages. Always check the actual dimensions listed on the diamond’s certificate, as this tells you its precise physical size.)
The Smart Money Play: Buying Just Shy of the “Magic Sizes”
Here’s a classic insider trick that works if you’re focused on value: don’t get fixated on hitting exactly a “magic size” like 1.00 ct, 1.50 ct, or 2.00 ct.
Diamonds priced just slightly below these numbers – like 0.95 ct to 0.99 ct, or 1.45 ct to 1.49 ct – often look visually identical to the naked eye as their slightly heavier counterparts, but cost significantly less per carat.
- Why it Works: It’s purely psychology and market pricing. There’s a huge demand jump right at those round numbers. Diamond cutters will try to hit that 1.00 ct mark even if it means slightly sacrificing ideal proportions (and therefore sparkle/spread).
Meanwhile, a stone that comes out of the cutting process at 0.98 ct and perfect proportions for brilliance might get a much lower price per carat simply because it’s under that 1.00 ct line. - The Savings: You can easily save anywhere from 5% to 15% or even more per carat by buying a 0.9something ct diamond compared to a 1.0something ct diamond, when they might have the exact same visual face-up size and sparkle factor due to cut quality.
This compounds at higher weights (e.g., saving even more between 1.45ct and 1.50ct). - My Recommendation: If you want the look of a 1 carat, search specifically in the 0.90-0.99 carat range. Compare their millimeter dimensions to those of 1.00 ct+ stones. Find a stone with excellent cut and dimensions comparable to heavier stones.
The Takeaway: Balance Weight with Appearance
Carat weight is a factor in size and a huge factor in price. But it’s not the only thing. Prioritize Cut to ensure you get maximum sparkle and good spread for the weight. Understand how different shapes carry weight and influence visual size.
And for crying out loud, explore those carat weights just shy of the common psychological barriers – your wallet will thank you, and nobody but a gemologist with a scale will know the difference in weight! Focus on finding the best looking diamond that fits your target carat range and budget, not just the highest number.
Step 7: Comparing Apples to Apples (Visually!)
Okay, you’ve narrowed down your list based on those GIA/AGS grades – Excellent/Ideal cut rounds, maybe you’re exploring those savvy I color, VS2 clarity stones. This is where you gotta put your detective hat on, and frankly, this is where the online experience from top vendors blows physical stores out of the water for transparency.
Remember how I said even diamonds with the exact same grades can look different? It’s absolutely true. Grades represent ranges, not a single point of perfection. An SI1 could be eye-clean and a great deal, or it could have a big black spot right on top.
An H color could look stunningly white in one shape/cut combination, and slightly warm in another. The written report is essential verification, but it’s not the full story of a diamond’s visual charm.
The Game Changer: High-Resolution 360-Degree Videos
From what I’ve seen change in the industry over the past decade, the advent of high-quality, 360-degree HD videos and images for individual diamonds is the single biggest win for the consumer. Vendors like James Allen pioneered this, and now Blue Nile offers it for many stones too.
This technology is how you can be your own expert and make the most informed visual decision without needing a loupe or years of training.
- Your Personal Inspection Tool: Forget generic stock photos. When you’re looking at a diamond listing on a recommended site, make sure there’s a video you can watch. Most allow you to rotate the diamond, often zoom in to 20x or even 40x magnification, and sometimes even change the lighting.
- Seeing is Believing: Use these tools exactly as if you were a gemologist holding the stone.
- Verify Clarity: Rotate the diamond and look for inclusions (those spots, lines, or clouds). Remember Step 5?
Is the diamond eye-clean to you in this video under realistic viewing zoom (typically anything over 10x will show things you won’t see in person)? Check how the inclusions look and where they are. - Check Color Nuances: Spin the diamond and see if you detect any warmth or tint that you don’t like, especially if you’re venturing into I or J colors, or selecting a stone for a white gold/platinum setting. Looking at the diamond against the grey/white background in the video is usually the best test for this.
- Assess Sparkle: Watch how the diamond interacts with light as it turns. Do you see lively flashes of white light (brilliance) and maybe pops of color (fire)? Does the sparkle pattern look even and attractive (scintillation)? This is where that critical Cut quality from Step 3 becomes visibly evident!
- Examine Shape Specifics: Especially for fancy shapes, look for any dark bow-ties, dull/windowed areas, or asymmetrical sparkle patterns that might indicate cut issues that weren’t captured perfectly by the report grade.
- Verify Clarity: Rotate the diamond and look for inclusions (those spots, lines, or clouds). Remember Step 5?
Using Comparison Tools Effectively
Beyond just viewing one stone at a time, the best online retailers allow you to add multiple diamonds to a comparison list and view their videos and specs side-by-side.
- Highlight Subtle Differences: This feature is invaluable. Pick 2-4 diamonds that meet your initial criteria and seem like strong contenders. Put them side-by-side. Play their videos simultaneously. Look back and forth.
This direct comparison is often the easiest way to spot subtle differences in color saturation, the visibility of inclusions, or how dynamically they sparkle that you might miss looking at them individually. - Data Meets Visual: On these comparison views, you’ll see their specs (Carat, Color, Clarity, Cut grade, Dimensions, Certification) right there next to the live video. This helps you understand why one might look slightly better than another with similar stats, and assess if the price difference aligns with the visual difference.
The Practical Power of Seeing
Spending the time on this step prevents future disappointment. It puts the power in your hands to judge the true visual appeal of the exact diamond you’re considering, complementing the trust you place in the lab certificate.
This is how you ensure that an eye-clean VS2 actually looks eye-clean, or that your fancy shape has minimal bow-tie. It’s the final quality control check you get to perform.
Bottom line: Once you’ve used the C’s to narrow your options, let the high-resolution videos be your guide. Look critically, compare potential diamonds visually, and trust your eyes. This step is crucial for making sure the diamond is not just good on paper, but genuinely stunning in “person.”
James Allen: Our 5-Star Choice for Price and Selection
Check our comprehensive James Allen Review to learn more about their pricing and commitment.
Step 8: Certifiably Confident – Understanding Diamond Certificates & Labs
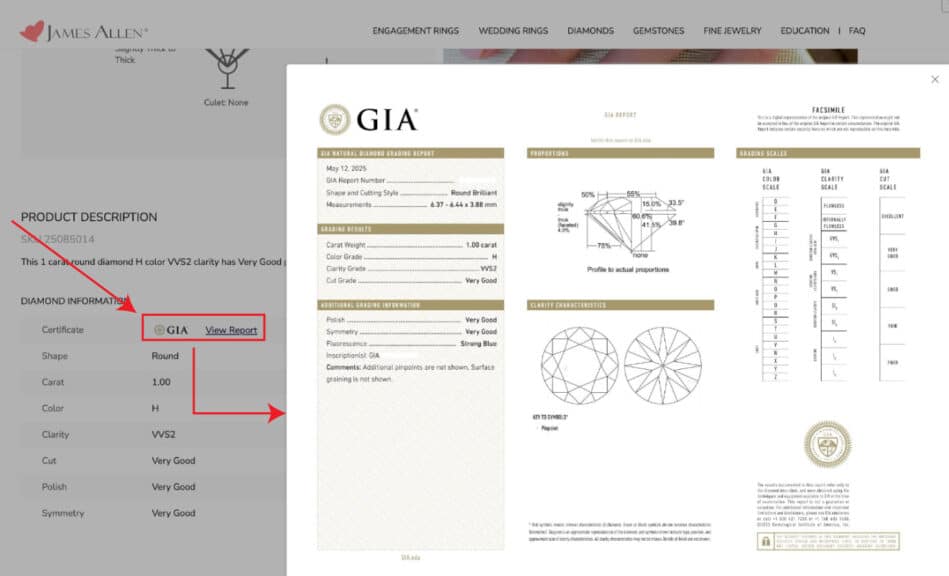
Alright, certifications. Every diamond you seriously consider should come with one from an independent laboratory. Think of this as the diamond’s official report card – it details its exact measurements, the 4 Cs grades, and other identifying characteristics. This piece of paper is your objective verification of what the vendor is selling you.
BUT – and this is where I need you to pay very close attention – here’s an insider warning: Not all teachers grade the same! Having handled countless diamonds with reports from just about every lab out there during my time on the wholesale and retail sides, I can tell you, often the hard way: GIA and AGS are the only labs whose grading I consistently trust.
Below is a 1.11 Carat Round Diamond Report,
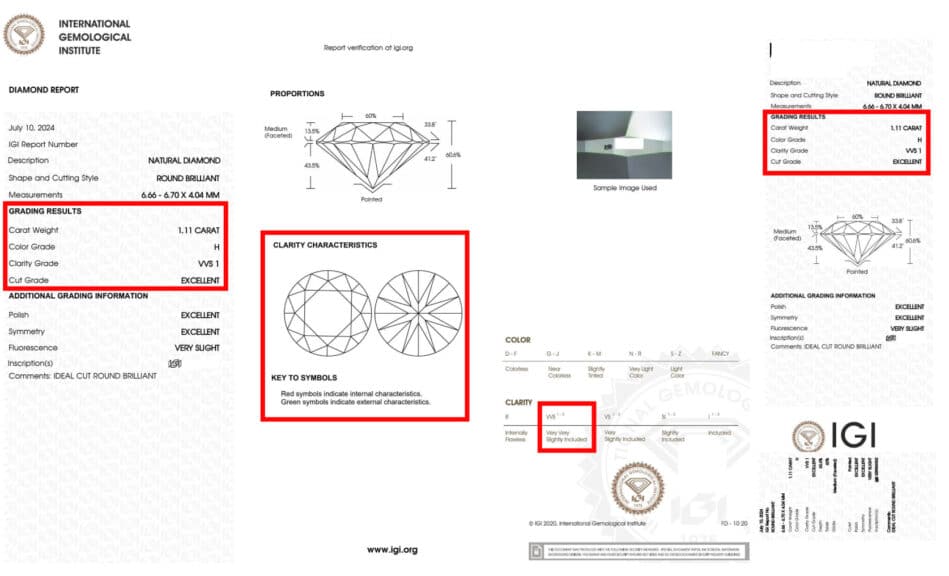
Why the strong stance?
- Consistency and Accuracy: GIA (Gemological Institute of America) and AGS (American Gem Society) are the most respected and consistent grading labs in the world. They have the strictest, most standardized grading criteria and employ highly trained gemologists.
When a GIA report says a diamond is an H color, you can be highly confident it is indeed an H color according to industry standards. When AGS gives an Ideal Cut grade, you know it’s based on rigorous light performance analysis. - Protecting Your Purchase: Other labs, sadly, can be notoriously inconsistent, and sometimes their grading is simply… loose. This means you might buy a diamond with an IGI or EGL report stating it’s a G color and VS1 clarity, but if a reputable lab like GIA graded the exact same diamond, it might come back as an I color and SI2 clarity.
You end up paying for grades you didn’t actually get. I saw this happen too often; it’s simply not a risk worth taking. - My Undeniable Advice: Don’t walk, RUN from diamonds primarily graded by labs like IGI, EGL, HRD, or any in-house jeweler appraisals presented as grading certificates. Period.
They do not have the same reputation for strict, consistent, and objective grading as GIA and AGS. Your diamond should only be certified by GIA or AGS.
Understanding Your GIA or AGS Certificate
Your GIA or AGS report contains a ton of information, but you don’t need a gemology degree to understand the critical parts for making your decision. You should match this report’s details to the online listing before buying.
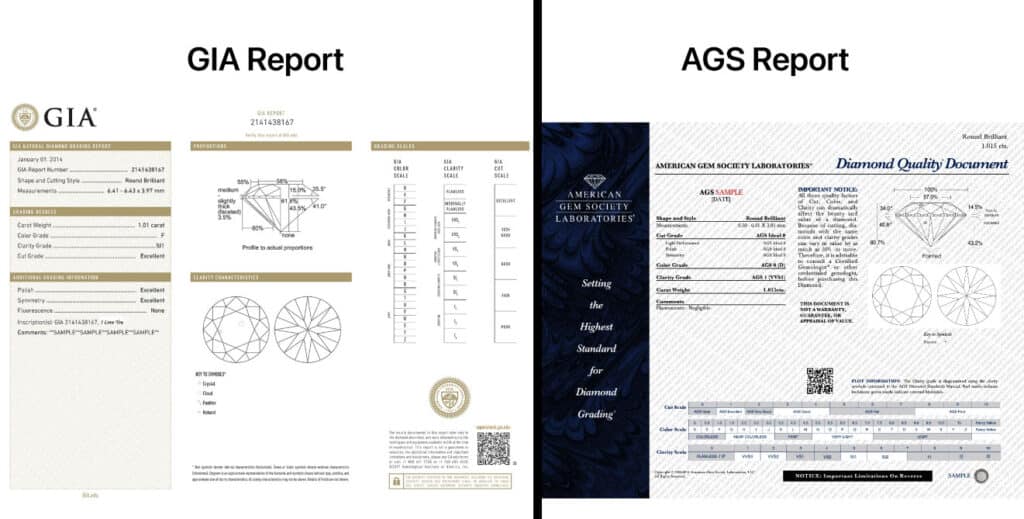
Here are the key sections you should check:
- Report Number & Laser Inscription: The report will have a unique serial number. Most certified diamonds (especially those sold online) will have this number laser-inscribed microscopically on the edge (the girdle) of the diamond itself. This is a vital security feature.
Always confirm the inscription number on the diamond matches the number on the certificate! (Use the online video or request an image showing the inscription if available). For lab-grown diamonds, the inscription will also state “Laboratory-Grown” plus the report number. - Measurements: This lists the exact dimensions of the diamond (e.g., diameter for a round, length x width for fancy shapes). Remember Step 6? Check these dimensions to confirm the diamond’s physical face-up size, especially compared to other stones or standard averages.
- The 4 Cs Grades: Clearly lists the Cut, Color, Clarity, and Carat Weight grades according to GIA or AGS standards. This is where you confirm the grades you filtered for!
- Clarity Characteristics/Plot: For Clarity grades of VVS2 and lower, the certificate includes a diagram plotting the type and location of inclusions (internal characteristics) and blemishes (surface characteristics). This map shows you where those VS or SI inclusions are located.
- Cut Details (for Rounds): For GIA Round diamonds, it details Polish, Symmetry, and Fluorescence, plus often Proportions (table, depth percentage, angles) which contribute to the overall Cut grade. For AGS Ideal cuts, there’s often light performance data.
- Fluorescence: Some diamonds exhibit fluorescence when exposed to UV light. The report notes the intensity (None, Faint, Medium, Strong, Very Strong). Generally, “None” or “Faint” fluorescence is preferred.
Strong or Very Strong fluorescence can sometimes make a diamond look slightly milky or oily, though this is rare. My take? Unless the certificate notes the stone appears milky or oily due to fluorescence, it’s usually not a major concern, but I personally stick to None, Faint, or Medium to be safe.
A Certificate is NOT an Appraisal
One final point that causes confusion: A diamond grading report (GIA, AGS) is not an appraisal. The report certifies the objective characteristics of the diamond (the 4 Cs, measurements, etc.). An appraisal is a document stating the estimated retail replacement value of the finished piece of jewelry (diamond + setting), typically used for insurance purposes.
An appraisal’s value is subjective and can vary depending on the appraiser. Do not confuse the detailed, scientific grading from GIA/AGS with an appraisal value. You need the grading report to verify what you’re buying, and usually, an appraisal after the purchase for insurance.
The Confidence Builder: Insisting on a GIA certificate gives you the peace of mind that the diamond’s core characteristics have been independently and consistently graded.
Learn to read those key sections, cross-reference them with the vendor’s listing and the diamond’s video, and confirm that laser inscription. This step solidifies your confidence in the quality and value of the exact diamond you are buying.
Step 9: Beyond the Stone – Ethical Sourcing & Origin
This is a question I get asked more and more often, and it’s an important one when you’re considering how to buy a diamond ring: “Are my diamonds ethically sourced?” You’ve likely heard terms like “conflict diamonds” or “blood diamonds” and you want to be sure your purchase didn’t contribute to terrible situations.
Thankfully, the industry has changed a lot over the past couple of decades in response to public awareness. But honestly? The term “conflict-free” isn’t always the full story, and you need to know what to look for and the right questions to ask.
The Kimberley Process: A Good Start, But Not the Whole Story
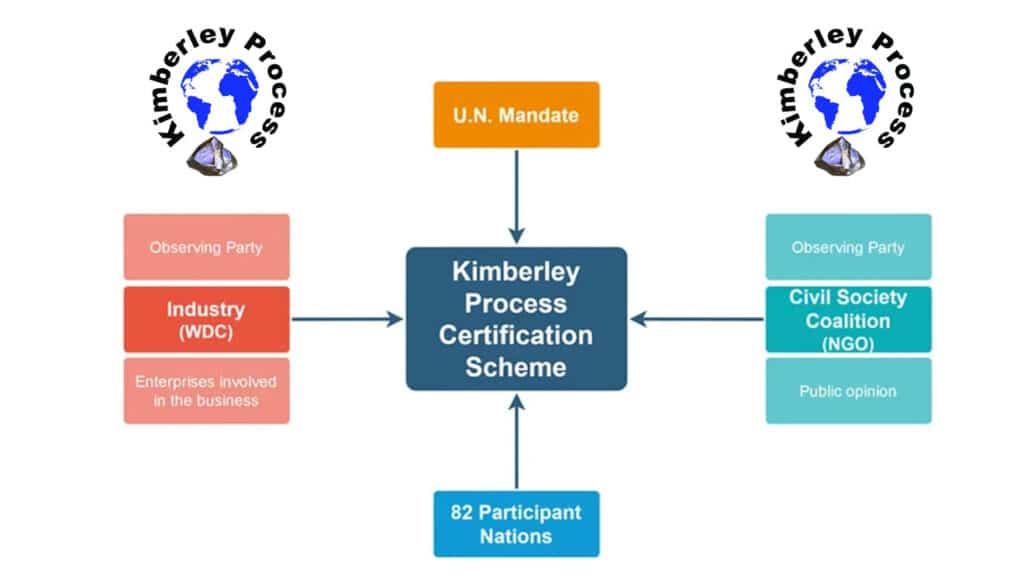
The most significant step the industry took was establishing the Kimberley Process (KP) Certification Scheme in the early 2000s. The primary goal of the KP is to prevent “conflict diamonds” – rough diamonds used by rebel movements to finance wars against legitimate governments – from entering the mainstream legitimate diamond market.
Here’s how the KP works simply:
- Participating countries (which produce or trade diamonds) agree to set up controls to prevent conflict diamonds from leaving their borders.
- Shipments of rough diamonds must be exported and imported in tamper-resistant containers, accompanied by a Kimberley Process Certificate.
- The certificate guarantees that the shipment is free from conflict diamonds based on written assurances.
The KP has been quite effective at drastically reducing the flow of rough stones explicitly funding rebel conflicts, probably reducing the market percentage of these specific stones from as high as 4% before the KP to well under 1% today. That’s a significant positive impact.
The Limitations: Where KP Doesn’t Reach
However, having talked to people involved in the chain, and looking at the scheme closely, it’s crucial to understand the KP’s limitations. It focuses only on that specific definition of “conflict diamonds” – financing rebel groups. It generally does not cover:
- Human Rights Issues: Working conditions, child labor, safety, fair wages in mining communities, or instances where state security forces are involved in violence or abuse.
- Environmental Impacts: The environmental footprint of mining operations (though reputable companies do have their own environmental standards).
- Broader Supply Chain Transparency: Knowing the exact mine the diamond came from can be challenging once parcels of rough stones are mixed and sent for cutting in different centers around the world. From my conversations with cutters and manufacturers, tracing an individual polished diamond all the way back to a specific mine isn’t standard for every stone.
So, a diamond being “Kimberley Process certified” means it’s not funding rebel conflicts, which is great. But it doesn’t automatically guarantee ethical practices throughout the entire supply chain – especially issues beyond the rebel group definition, or full mine-to-finger traceability.
ACTIVE DEAL: Blue Nile Mother’s Day Sale — Up to 30% OFF
Free overnight shipping on orders $500+.
Free 30-day returns. Lifetime warranty.
Also: New email subscribers get $50 off their first order of $500+.
Looking for more? Check out the Clear The Vault event.
*Exclusions may apply. See Blue Nile for complete details.
Looking Beyond KP: What Responsible Retailers Do
The good news is that the industry is evolving, pushed by both consumer demand and forward-thinking companies. Reputable vendors and major mining companies are going beyond the KP to address these broader ethical and environmental concerns.
Look for retailers who:
- Have Established Supply Chain Protocols: They work with trusted suppliers who adhere to strict standards regarding human rights, labor practices, and environmental protection, often aligned with programs like the World Diamond Council System of Warranties or others focused on best practices.
- Invest in Traceability Initiatives: Some companies are developing technologies and programs to track diamonds more closely from mine to market. While universal “mine of origin” reporting for every single stone is still complex, transparency is improving.
- Support Mining Communities: Many large mining companies invest significantly in healthcare, education, and infrastructure in the communities where they operate, creating positive socio-economic impacts. Ask vendors how they ensure their suppliers contribute positively.
- Offer Specific Provenance Options: Some retailers can offer diamonds from specific, verified sources (e.g., Canadian diamonds known for strict standards, or diamonds from mines with publicly documented ethical practices).
Read Our 5-Star Blue Nile Review
Check our comprehensive Blue Nile review to learn why we rated Blue Nile 5 stars for their exceptional quality and value.
What YOU Should Ask Your Vendor
When you’re evaluating a diamond and vendor, don’t hesitate to ask questions about their sourcing. A trustworthy retailer will be transparent and ready to provide information.
- “How do you ensure your diamonds are sourced responsibly?”
- “Do you have specific policies regarding human rights and labor practices in your supply chain beyond the Kimberley Process?”
- “Are there any traceability initiatives you participate in?”
- “Can you tell me more about the origin of the specific diamond I’m interested in, if possible?”
Also, consider options like recycled or vintage diamonds. These are natural diamonds being re-introduced into the market, and purchasing them is inherently sustainable as no new mining is involved.
Lab-grown diamonds are also an option that avoids the complexities of mined origins entirely, as discussed in Step 2.
The Ethical Choice: Your purchase power can encourage positive practices. By choosing a retailer committed to responsible sourcing beyond just basic conflict-free certification and by asking pointed questions, you’re contributing to a more ethical and transparent diamond industry.
It takes a little effort to look past the surface, but it’s absolutely worth it to feel good about the story behind your ring.
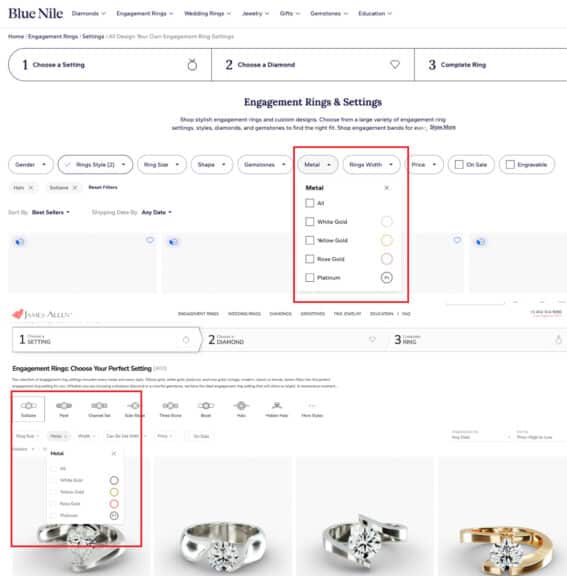
Step 10: The Perfect Foundation – Choosing the Ring Setting & Metal
You’ve found that incredible stone, maybe that eye-clean I color, VS2 clarity gem you snagged at a fantastic value because you paid attention to Cut and knew what “eye-clean” really meant. Awesome! Now that diamond needs a setting.
The setting does way more than just hold the diamond securely, although security is absolutely paramount. It’s the design framework of the ring. It dramatically influences the overall aesthetic – vintage, modern, minimalist, glamorous? The setting also impacts:
- The Diamond’s Apparent Size: Some settings make the center stone look larger (hello, halos!).
- Sparkle Factor: Settings can allow more light into the diamond, or sometimes block it if poorly designed.
- Protection: How exposed is the diamond to bumps and knocks?
- Lifestyle Compatibility: Does the design fit how the wearer lives, works, and plays?
- Budget: Setting styles and complexity significantly impact the final ring cost.
You need to choose a setting that complements the diamond’s shape and size, matches personal style, and fits comfortably into daily life and budget. There are countless variations, but here are some popular types you’ll see constantly, along with my quick takes based on practicality and style:
- The Solitaire: The classic. A single center diamond, typically held by prongs (usually 4 or 6).
- Pros: Puts 100% focus on the diamond itself, allowing maximum light to enter. Simple, timeless, elegant, and generally the most budget-friendly setting style. Easy to clean around the diamond.
- Cons: The diamond is relatively exposed (more prone to snagging or impact compared to bezel settings). Requires regular prong checks to ensure security.
- Mehedi’s Take: Great choice if you have a diamond with amazing Cut and want it to be the undisputed star. A thinner band can make the diamond look even bigger. Timeless elegance is never a bad bet.
- Pave (pronounced “pa-vay”): Features small diamonds embedded closely together on the band or surrounding the center stone, giving a surface “paved” with diamonds.
- Pros: Adds a ton of extra sparkle without overwhelming the center stone. Enhances the overall bling factor. Can make the center stone look more prominent by contrast.
- Cons: Pave diamonds can potentially fall out over time, especially with thin bands or hard wear (though good settings minimize this). Can be harder to resize extensively without potentially losing stones or disrupting the pattern. More complex cleaning.
- Mehedi’s Take: Adds beautiful sparkle, but durability matters! Pay attention to the quality of the pave work. Fancier pave settings can get pricey quickly. Thinner pave bands (<1.8mm) can sometimes twist or bend more easily over time, especially with a larger center stone – balance thinness for aesthetics with practical durability.
- The Halo: A circle or shape of smaller diamonds surrounding the center stone.
- Pros: Makes the center diamond appear significantly larger (can add 0.25 to 0.50 ct or more to the perceived size, visually speaking). [Based on common estimates of how halos visually augment size].
Adds lots of sparkle. Can sometimes help conceal slight color or inclusions near the girdle of the center stone. Very popular currently. - Cons: Takes some focus away from the center stone’s individuality. Like pave, introduces many small diamonds that require security checks. Can sit higher profile.
- Mehedi’s Take: Huge bang for your buck in terms of perceived size! If you want that “wow” factor but the budget doesn’t quite reach a larger carat weight, a halo is a fantastic option. Pay attention to the halo proportion relative to the center stone – too big or too small can look off.
- Pros: Makes the center diamond appear significantly larger (can add 0.25 to 0.50 ct or more to the perceived size, visually speaking). [Based on common estimates of how halos visually augment size].
- The Three-Stone (or Trilogy): A center stone flanked by two smaller diamonds (or other gemstones).
- Pros: Represents past, present, and future. Adds significant overall sparkle and visual weight to the ring. Offers opportunities for customization with side stones of different shapes or colors.
- Cons: Requires careful consideration of the proportions of the side stones to the center stone for balance. Generally higher cost than a solitaire.
- Mehedi’s Take: A very meaningful and classic style. Ensure the side stones are well-matched in quality (Cut, Color) to the center stone, or they’ll detract.
- Bezel Setting: The diamond is surrounded by a complete circle of metal that holds it securely.
- Pros: Offers maximum protection for the diamond’s girdle (edge) and pavilion. Very secure. Gives a sleek, modern look. Less likely to snag on clothing. Can sometimes make a diamond look slightly larger by outlining it in metal.
- Cons: Reduces the amount of light entering the diamond’s sides, potentially slightly impacting sparkle compared to prong settings. Hides more of the diamond. Less traditional look than prongs for many.
- Mehedi’s Take: Fantastic choice for active lifestyles or if the wearer is prone to hitting their hands. Provides serious security. Just be aware you might sacrifice a tiny bit of potential light return from the lower facets compared to prongs, but the protection is often worth it for practicality.
Choosing Your Metal: Looks, Longevity, and Necessary Care
The metal you choose isn’t just about color preference; it’s a practical decision impacting durability, cost, and maintenance. As rings get worn daily for a lifetime, the metal needs to hold up.
Common precious metals for engagement rings are Platinum and various types of Gold. Here’s a breakdown based on my experience handling and seeing the wear-and-tear on rings over time:
- Platinum:
- Pros: Extremely durable and strong. Hypoallergenic (great for sensitive skin). Develops a natural patina (a soft sheen) over time rather than losing metal. Its natural white color will never fade or require replating. Provides the most secure setting for diamonds over the very long term because it’s so tough.
- Cons: The most expensive precious metal choice (significantly denser and more rare than gold). Scratches exist as displaced metal (the patina is essentially these small displacements over the surface, reducing the high polish finish). Requires professional polishing to restore high shine. Can be slightly heavier.
- Mehedi’s Take: If your budget allows, Platinum is arguably the best long-term choice for durability and security. It’s incredibly hard-wearing, and that natural white color is forever. The patina is personal preference – some love the aged look, others prefer repolishing periodically.
- Gold (10k, 14k, 18k, 24k): Gold is naturally yellow and is alloyed with other metals to increase hardness and change color. Karat indicates purity (24k is 99.9% pure gold; 18k is 75% gold; 14k is 58.3%; 10k is 41.7%). Lower karat numbers mean harder, more durable metal for jewelry, but less pure gold content.
- 14k Gold: Most common for engagement rings in the US. Good balance of durability and purity. More resistant to scratching and bending than 18k.
- 18k Gold: Higher gold purity (richer color, more hypoallergenic than 14k for some). Slightly softer and more prone to scratching than 14k. Considered the standard in many parts of the world.
- Mehedi’s Take on Karat: For daily wear like an engagement ring, I generally recommend 14k or 18k gold. 10k is too low in gold content for many jewelry standards and ethical considerations often prioritize higher gold percentages. 24k is too soft for jewelry settings. Your choice between 14k and 18k often comes down to balancing budget, purity preference, and wear durability (14k is a bit tougher).
- Yellow Gold: Gold mixed primarily with silver and copper. The traditional choice.
- Pros: Classic warmth. Very easy to maintain polish. Does not show dirt/wear as readily as white metals. Compliments diamonds with slight color tints (I, J, K colors).
- Cons: None significant, aside from personal color preference.
- Mehedi’s Take: A beautiful, enduring choice that’s very low maintenance from a metal perspective.
- White Gold: Gold mixed with white metals like palladium, nickel, and silver, then plated with a layer of rhodium for a bright white finish. (Note: Contains nickel usually, so check if allergic).
- Pros: Popular bright white look that enhances colorless diamonds. Less expensive than platinum.
- Cons: Requires replating. The rhodium layer wears off over time (can be 1-5 years depending on wear), revealing the slightly yellowish or grayish base metal underneath. Requires professional re-dipping (cost varies, can be ~$40-100+ periodically) to maintain its bright white look.
- Mehedi’s Take: This is the crucial maintenance detail most people don’t realize! If you choose white gold, factor in that recurring cost and need for upkeep to keep it looking its best. If you want a permanent white metal and can afford it, Platinum is better.
- Rose Gold: Gold mixed with a higher proportion of copper (giving it the pinkish hue).
- Pros: Unique, romantic color. Durable (copper adds hardness). Color is permanent, no plating needed.
- Cons: Copper content can cause issues for people with copper allergies (less common than nickel allergies, but possible). Limited availability compared to white or yellow gold in some settings/designers.
- Mehedi’s Take: A stylish, durable alternative gaining popularity. Ensure the wearer doesn’t have a copper allergy.
Essential Ring Care Tips
Regardless of the setting style or metal you choose, a diamond engagement ring is meant to be worn, but also cared for. Regular cleaning and occasional check-ups will keep it sparkling and secure. From what I’ve seen needing repair over the years, neglect is the number one enemy!
- Cleaning at Home (Regularly!): The best method for regular cleaning is simple: warm water, mild dish soap, and a soft brush (like a soft toothbrush reserved for jewelry). Gently scrub the diamond and setting, especially the back of the diamond where oils from your skin and lotions collect (this is key for sparkle!). Rinse thoroughly with warm water and dry with a soft, lint-free cloth.
- ** ultrasonic Cleaners: Use with Caution:** Small ultrasonic jewelry cleaners are popular, but be careful. They work by using vibrations to loosen dirt, but these vibrations can sometimes loosen stones that aren’t perfectly set or damage certain gem types (like emeralds, pearls, or diamonds with inclusions treated by fracture filling or laser drilling).
If you have pave or a center stone with tricky inclusions, I’d stick to soap and water. Never put fragile gems like emeralds or pearls in one. - When to Get Professional Cleaning & Check-ups: Visit a trusted local jeweler (yes, there’s a place for local guys for maintenance!) about every 6-12 months for a professional steam cleaning and, critically, a check of the prongs. Prongs can wear down, get bent, or loosen slightly with daily wear. Catching a loose prong before your diamond falls out is the most important preventative maintenance there is!
- What to AVOID: Take off your ring for harsh activities (gym, gardening, cleaning with harsh chemicals). Avoid exposing it to chlorine bleach or other strong chemicals as they can damage the metal, especially gold alloys. Lotions, hairspray, and makeup build-up quickly and dull sparkle – put your ring on after getting ready.
- Storing Your Ring: When you’re not wearing it, store it separately in a fabric-lined jewelry box compartment or a soft pouch. Diamonds can scratch other jewelry (and each other!), and metal can scratch stones.
The Takeaway: Don’t underestimate the importance of setting and metal choices for the overall look, feel, and longevity of the ring. Balance aesthetics with practicality. Understand the maintenance required for your chosen metal and commit to simple, regular care to keep your investment looking beautiful and secure for decades.
Getting these final details right means the difference between a ring you adore and wear worry-free, and one that causes headaches.
Step 11: Finalizing Your Purchase & What Happens Next (Sizing, Insurance, Resale)
You’re almost there! Clicking that final “buy” button on such a significant purchase can feel scary, I totally get it. It’s a lot of money, and it’s loaded with meaning.
But if you’ve followed the steps in this guide – focusing on the Cut and eye-cleanliness that matters, finding value in color and carat, insisting on GIA/AGS certification, using the high-res videos to see for yourself, and choosing a trusted vendor – you are making an incredibly informed decision.
You know exactly what you’re paying for.
Here’s what happens when you finalize your purchase online with a reputable vendor:
- Order Confirmation: You’ll receive an email confirming all the details of your order (the exact diamond spec/certificate number, the setting chosen, the price, shipping address). REVIEW THIS CAREFULLY!
- Processing and Setting: If you bought a loose diamond and setting as a “build your own,” the vendor’s jewelers will set the diamond securely into the mounting you chose. This takes some time, typically a few days to a week depending on complexity.
- Shipping: Once assembled and quality-checked, the ring will be packaged and shipped. Reputable vendors always ship securely, often fully insured, and usually require a signature upon delivery. They’ll provide tracking information.
- The Inspection Period: This is KEY and why trusted online vendors are excellent. They universally offer a risk-free inspection and return period, typically 30 days or even longer. [Most common return window offered by top vendors].
Use that return window! When the ring arrives, open it carefully. Look at the diamond with your own eyes again – in different lighting (indoor, outdoor). Compare it to the video if you saved the link. Match the certificate details to the stone and setting.
If there’s a laser inscription, verify it matches the certificate number. If, for any reason, you have doubts – maybe it doesn’t look exactly like you expected, maybe it just doesn’t feel right, or perhaps (rarely, with a good vendor) there’s an issue – use their return policy!
Don’t hesitate. It’s there for your protection and peace of mind. Getting your money back and trying again is 100% better than settling for something you don’t absolutely love.
Getting the Size Just Right: Tips for a Perfect Fit (H3 / Step 11 – Part 2, Gap Fill: Sizing)
Another logistical piece: size. You need that ring to fit perfectly. While most settings can be resized, some complex styles (like full eternity bands or tension settings) are difficult or impossible. Even standard resizes carry a small risk and can potentially disrupt pave stones. Getting the size right before you buy is always the goal if possible.
- The Most Reliable Way (If Not a Surprise): Simply get sized by a couple of different reputable jewelers. Ring sizes can vary slightly between jewelers or based on ring width and profile, so checking with two places gives you confidence.
- For a Surprise Proposal: This is tricky! Your mission: subtly find out the size.
- Borrow a Ring: The classic trick. Sneak a ring your partner wears on their ring finger (or the target finger) and take it to a jeweler to be sized, or press it into a bar of soap or clay to leave an impression you can measure later.
Make sure it’s a ring worn on the correct finger, as fingers on the same hand and between hands vary! - Ask for Help: Enlist a trusted friend or family member (sibling, best friend) to get the size information discreetly. They might already know it or can find a way to ask without giving away the surprise.
- Use Online Sizers: Many top online vendors (like James Allen and Blue Nile) offer free plastic ring sizers they can mail you discreetly beforehand. Obviously, this only works if your partner is in on selecting the ring, or if you live apart!
- Borrow a Ring: The classic trick. Sneak a ring your partner wears on their ring finger (or the target finger) and take it to a jeweler to be sized, or press it into a bar of soap or clay to leave an impression you can measure later.
- When in Doubt, Guess Up (Slightly): If it’s a total surprise and you have to guess, err on slightly larger rather than smaller. It’s usually easier and safer to size a ring down than up, especially with stones involved. A ring that’s too big will still slide onto the finger for the proposal photo ops, even if it needs immediate resizing!
- Check Resizing Policies: Confirm the vendor’s resizing policy before purchasing. Most offer one free resizing within a certain period after purchase for standard settings. Know the timeframe and any fees for subsequent resizes or complex rings.
(Note: Include a simple image or graphic related to ring sizing – maybe a measurement scale, or diagram explaining finding the right size.)
(Note: Mention or link to vendor pages discussing their free sizer and resizing policies.)
Protecting Your Investment: Insurance & The Real Purpose of Appraisals
Alright, crucial, practical adulting time. Your diamond engagement ring is a significant asset, often worth thousands or tens of thousands of dollars. Once it’s on your finger, you need to protect it. Get insurance. Immediately.
From what I’ve seen over the years, accidents happen. Diamonds can come loose, rings can be lost during travel, or they can unfortunately be stolen. Trust me, having a ring vanish when it isn’t insured is truly heartbreaking and a huge financial hit that is completely avoidable.
- Homeowner’s/Renter’s Insurance: Your standard policy might offer some coverage for jewelry, but it’s usually minimal (often capped at $1,000 or $2,000 total for all jewelry) and losses might count against your deductible or even impact your entire policy premium.
For full protection, you’ll almost always need to add a specific “floater” or “rider” for your engagement ring. - Dedicated Jewelry Insurance: Companies like Jewelers Mutual specialize solely in jewelry insurance. Often recommended by reputable vendors, they tend to offer broader coverage (including “mysterious disappearance” – basically, if you just lose it) and don’t tie into your homeowner’s policy, meaning a claim won’t potentially affect that coverage.
The cost is typically very reasonable, usually 1-2% of the ring’s value per year. [General estimate of jewelry insurance cost]. A $10,000 ring might cost100−100−200 a year to insure fully. - How to Insure: You’ll need an appraisal (or sometimes just the detailed vendor invoice and grading report if the ring is new) to get coverage. Contact your insurance provider before you need it to ask about adding the ring or getting a separate policy.
(Note: Include logos/icons for common insurance types or Jewelers Mutual.)
Appraisals: What They Are and Aren’t (Revisited)
Let’s revisit appraisals quickly, picking up from Step 8’s mention. Remember how I said a GIA/AGS grading report is different from an appraisal? This is where it matters.
- Purpose of an Appraisal: An appraisal exists primarily to determine the Estimated Retail Replacement Value of your jewelry at a specific point in time. This is the value insurance companies use to determine how much they would pay out if the ring was lost, stolen, or irreparably damaged. It accounts for the diamond, the metal, the setting labor, and even current market retail prices.
- Appraisals Aren’t Graduations: They do NOT verify the 4 Cs. They use the existing grading report (GIA, AGS) as a basis for the diamond’s quality in conjunction with market data and the ring’s construction to arrive at a dollar value.
- When You Need One: You need an appraisal to get your ring insured for its full value.
- Appraisals from Online Vendors: Reputable online retailers will almost always provide an appraisal along with your GIA/AGS certificate and invoice when you purchase the ring. For insurance purposes right after purchase, this vendor-provided appraisal is typically sufficient.
- Independent Appraisals (Often Not Needed Immediately): An independent appraisal (from someone who is only an appraiser, not a selling jeweler, like an ASA or NAJA certified appraiser) is usually only necessary if:
- Your insurer specifically requires one beyond the vendor appraisal.
- You bought a ring without a reliable grading report or vendor appraisal (which you definitely won’t do if you follow this guide!).
- You inherited jewelry or want a value updated significantly years after purchase.
(Note: Clarify that the provided appraisal from a trusted online vendor IS suitable for initial insurance in most cases).
The Honest Talk About Resale Value
Alright, deep breath for this one. As your advocate, I need to give you the straight scoop that frankly, many places you might shop won’t tell you. A diamond engagement ring is typically NOT a financial investment you should expect to appreciate or even hold its original purchase value if you try to sell it later.
Let me give it to you straight from seeing how diamonds move from cutters, to wholesalers, to retailers, and back into the secondary market sometimes:
- Retail Markups are Significant: By the time a diamond makes it from the mine, through cutting/polishing, various wholesale steps, to a retail store (online or physical), markups are added at every stage to cover costs and profit.
The price you pay as the final consumer reflects all those steps, plus the retailer’s operating costs (staff, marketing, beautiful websites or storefronts). - Secondary Market Reality: If you sell a used ring (or just the diamond) to a jeweler, a diamond buyer, or even on a peer-to-peer site, you are now operating in a different market with different margins.
The buyer needs to buy it for significantly less than current wholesale cost so they can resell it (either as a loose stone or in new jewelry) at a profit or to make the repair/refurbishment worthwhile. - What to Expect (Realistically): While it varies based on market conditions, diamond specs, certificate (having a GIA/AGS report helps tremendously!), and who you sell to, if you were to try and sell your diamond ring shortly after purchase, you might only get back anywhere from 30% to 70% of the original retail price you paid.
Selling it back to the original retailer is almost always the lowest return, as they have no incentive to buy it back at high value. Selling a loose diamond with a solid GIA/AGS certificate on a secondary market or consignment might yield better, but still significantly below retail. - Buy for Love, Not Profit: This isn’t to discourage you from buying a ring! It’s to set realistic expectations. Buy the diamond because you love its beauty, because it symbolizes your commitment, and because it holds incredible sentimental value for you.
Its value is emotional and personal, not usually financial over time.
(Note: Include a simple visual or summary box showing a Purchase Price and a much lower arrow pointing to a “Typical Resale Value Range” with percentages, illustrating the difference clearly.)
(Note: Link to a detailed internal article explaining diamond resale value factors in more depth.)
The Final Check After Delivery
So, you’ve made the purchase. The ring has arrived. You’ve inspected it within the return window. Looks perfect. Fits great (or you’re arranging resizing). Insurance is lined up. Congratulations! You successfully navigated the diamond buying process like an insider. Your focus now is simply enjoying the beautiful symbol of your commitment and keeping it secure and sparkling with regular care.
(Note: As this wraps up the main steps, the next section in the outline would be the call to action for personal assistance and then the comprehensive FAQ.)
FAQs: Your Top Diamond Buying Questions, Answered by Mehedi
You’ve gone through the steps, learned about the 4 Cs, certificates, sourcing, and settings. But naturally, a few more specific questions pop up. Based on the dozens of conversations I’ve had with people looking to buy a diamond ring, here are the ones that come up most often, with my direct answers.
You’re Ready: Go Find That Stunning Diamond Ring!
Alright, deep breaths! We’ve journeyed through the often-confusing world of buying a diamond ring together. You’ve learned what really matters (Cut!), where the value hides (those specific Color and Clarity zones!), the truth about certificates (GIA/AGS are your non-negotiables), how to see the diamond’s actual sparkle (videos!), and the honest facts about natural versus lab-grown, sourcing, and protecting your investment.
My goal was to take all that insider knowledge I gained from being on the “other side” and put it squarely in your corner. You are no longer a newbie navigating a minefield; you’re an informed buyer equipped to spot value and beauty like a pro.
You have the steps, you know the tricks, and you’re ready to confidently find a stunning diamond ring that perfectly symbolizes your commitment without getting overcharged for invisible features. Go use those filters, watch those videos, and trust the process. You got this. And hey, if you want that extra layer of confidence, you know where to find me for a personal assist.
Happy hunting for that perfect sparkle!
About the Author

Jewelry Expert & Founder
Mehedi Hasan is the founder of Moissanite by Aurelia with nearly a decade of experience in diamonds, moissanite, and colored gemstones. His work has been cited in Us Weekly, People, and Page Six.
Read full bio