
Ring stacking is one of those things that looks effortless when done well and chaotic when done wrong — and the difference between the two comes down to about five principles that every guide either buries in paragraphs or never explains at all.
This is the ring stacking guide that actually answers the questions: how many rings, which fingers, what goes with what, whether you can mix metals, what to do with your engagement ring, and where the line is between a curated stack and a cluttered hand.
The short version: start with one statement piece and build outward. Balance matters more than quantity. Mixing metals is allowed — and encouraged. Your engagement ring can anchor a stack or stand alone. There is no rule that cannot be broken if it looks good on your hand. But there are principles that make it easier to get there.
TLDR — The Ring Stacking Essentials
| Question | The Answer |
|---|---|
| How many rings per finger? | Maximum 3–4 per finger for functional wear; 2 is the practical sweet spot |
| How many fingers? | Up to 4 at once; leave at least 1 finger bare for visual balance |
| Can you mix metals? | Yes — mixing gold, silver, and rose gold is a deliberate style choice in 2026 |
| Where to start? | One statement piece, then build with thinner bands around it |
| Can engagement rings be stacked? | Yes — curved or contoured bands stack cleanly; straight bands leave gaps |
| Left or right hand? | Both — stack traditionally on the left ring finger or spread across both hands |
| Even or odd number of rings? | Odd numbers (3, 5, 7) create more visually dynamic stacks |
| Best ring types for stacking? | Thin bands, chevrons, curved bands, bezel-set stones, eternity bands |
| What to avoid? | Rings that are too wide for the same finger; all rings the same thickness |
| Mehedi’s rule | Build your stack over time, not all at once — the best stacks are collected, not purchased as a set |
What Is Ring Stacking and Why Is It Trending in 2026?
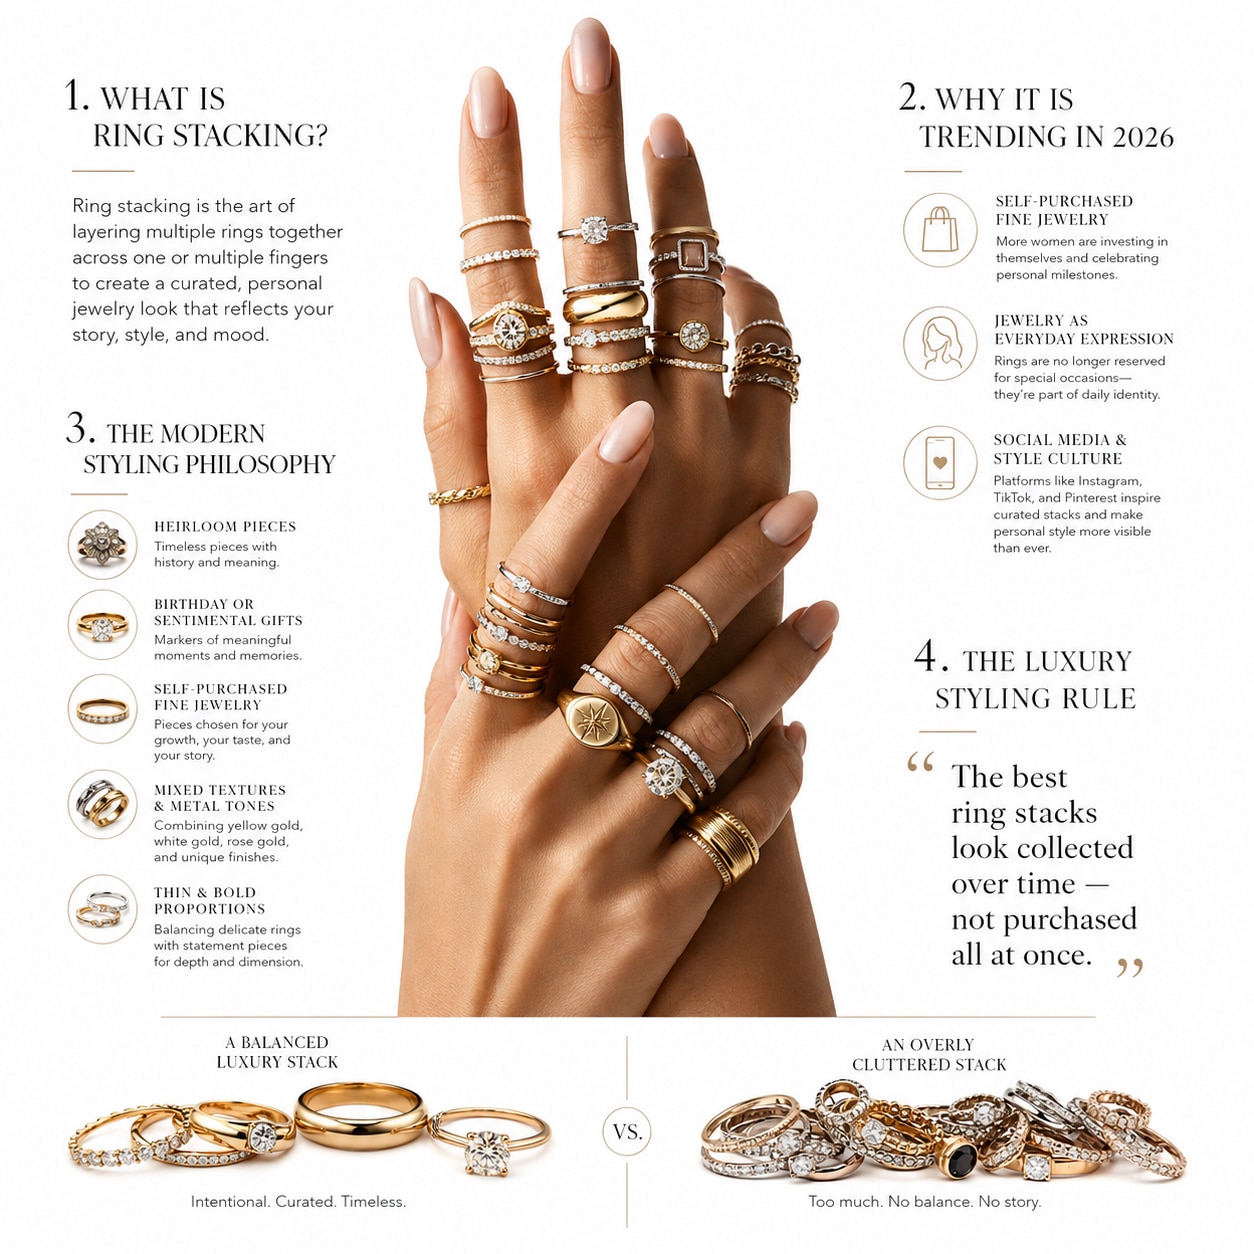
Ring stacking is the practice of wearing multiple rings together — on the same finger, on multiple fingers, or spread across both hands — to create a layered, personal jewelry look. It is not a new concept: the Victorians stacked rings by stacking sentimental pieces, and multiple rings across several fingers have been a traditional practice in many South Asian, Middle Eastern, and African cultures for centuries.
What is new in 2026 is the mainstream Western fashion adoption of ring stacking as a primary jewelry styling approach rather than a special-occasion choice. The trend has been driven by three converging factors: the rise of fine jewelry as self-purchase rather than gift-only, the growth of jewelry as everyday personal expression (not just bridal or formal), and social media’s role in making curated personal style more visible and aspirational.
The result: ring stacking in 2026 is not about excess — it is about personal curation. The best stacks tell a story about the person wearing them, mixing meaningful pieces (an heirloom, a birthday gift, a self-purchase) with intentional design choices (texture, scale, metal tone). A stack that looks like it was assembled over years of living is more compelling than one purchased as a set on a single day.
Mehedi’s Expert Take: “The clients I see with the most beautiful ring stacks almost always built them the same way: slowly. A wedding band. A birthday gift. A piece from a trip. Something they bought themselves after a promotion. The stack is a timeline. That is why it looks like them — because it is. The best advice I give anyone who asks how to start stacking is the same: begin with one ring that means something, and let the rest follow.” — Mehedi Hasan, Diamond Industry Veteran
How Many Rings Should You Stack? The Rules on Quantity
The most common question — and the most overthought. Here is the honest answer.
How Many Rings Per Finger?
The practical maximum for functional, comfortable daily wear is 3–4 rings per finger. Above 4, finger movement becomes restricted, rings begin to feel uncomfortable over a full day, and the visual effect tips from intentional to cluttered.
The sweet spot for most wearers is 2–3 rings per finger — enough to create a clearly stacked look without restricting movement. If one ring is a wider band (3–4mm+), treat it as occupying the visual space of two thinner rings.
| Rings Per Finger | Look | Comfort | Best For |
|---|---|---|---|
| 1 | Clean, statement | Maximum comfort | Every day; highlight one ring |
| 2 | Classic stack | Very comfortable | Daily wear sweet spot |
| 3 | Full stack | Comfortable | Statement look; balanced with thin bands |
| 4 | Maximum | Moderate | Special occasions; keep rings thin |
| 5+ | Avant-garde | Limited movement | Fashion shoot, not daily wear |
How Many Fingers?
Wearing rings on up to four fingers at once — across one or both hands — is the practical upper limit for a balanced look. Spreading rings across more fingers prevents any single finger from becoming visually overloaded.
The most visually balanced approach: wear rings on an odd number of fingers (3, 5, or 7 out of ten). Odd-numbered arrangements create a natural, asymmetric balance that feels curated rather than rigid. Even-numbered distributions — same ring count on every finger — read as intentional uniformity, which works for some looks but risks appearing too matched.
Leave at least one finger bare on whichever hand has the most rings — most people leave the pinky or thumb ringless, which creates visual breathing room. Having your rings spread across all ten fingers with no bare finger creates a “everywhere” effect that competes with itself.
Which Finger Should You Stack Rings On?
Each finger carries its own traditional meaning and practical wearing considerations. Knowing both helps you choose where to stack intentionally.
The Finger Guide
| Finger | Traditional Association | Stack Suitability | Practical Notes |
|---|---|---|---|
| Ring finger (left) | Marriage, commitment, romance | Excellent — natural anchor for stacking | Engagement and wedding rings anchor the stack |
| Ring finger (right) | Self-expression, fashion rings | Excellent | Freedom to stack without bridal consideration |
| Middle finger | Personal strength, balance | Very good — widest finger, accommodates more | Widest finger; handles statement pieces well |
| Index finger | Ambition, leadership, fashion | Good | More visible in daily tasks; good for statement rings |
| Pinky | Independence, self-expression | Good for single or double ring | Smaller; thin rings only; often left bare in a stack |
| Thumb | Willpower; fashion-forward choice | Statement option | Growing in popularity; fits bold individual rings |
The Left vs Right Hand Question
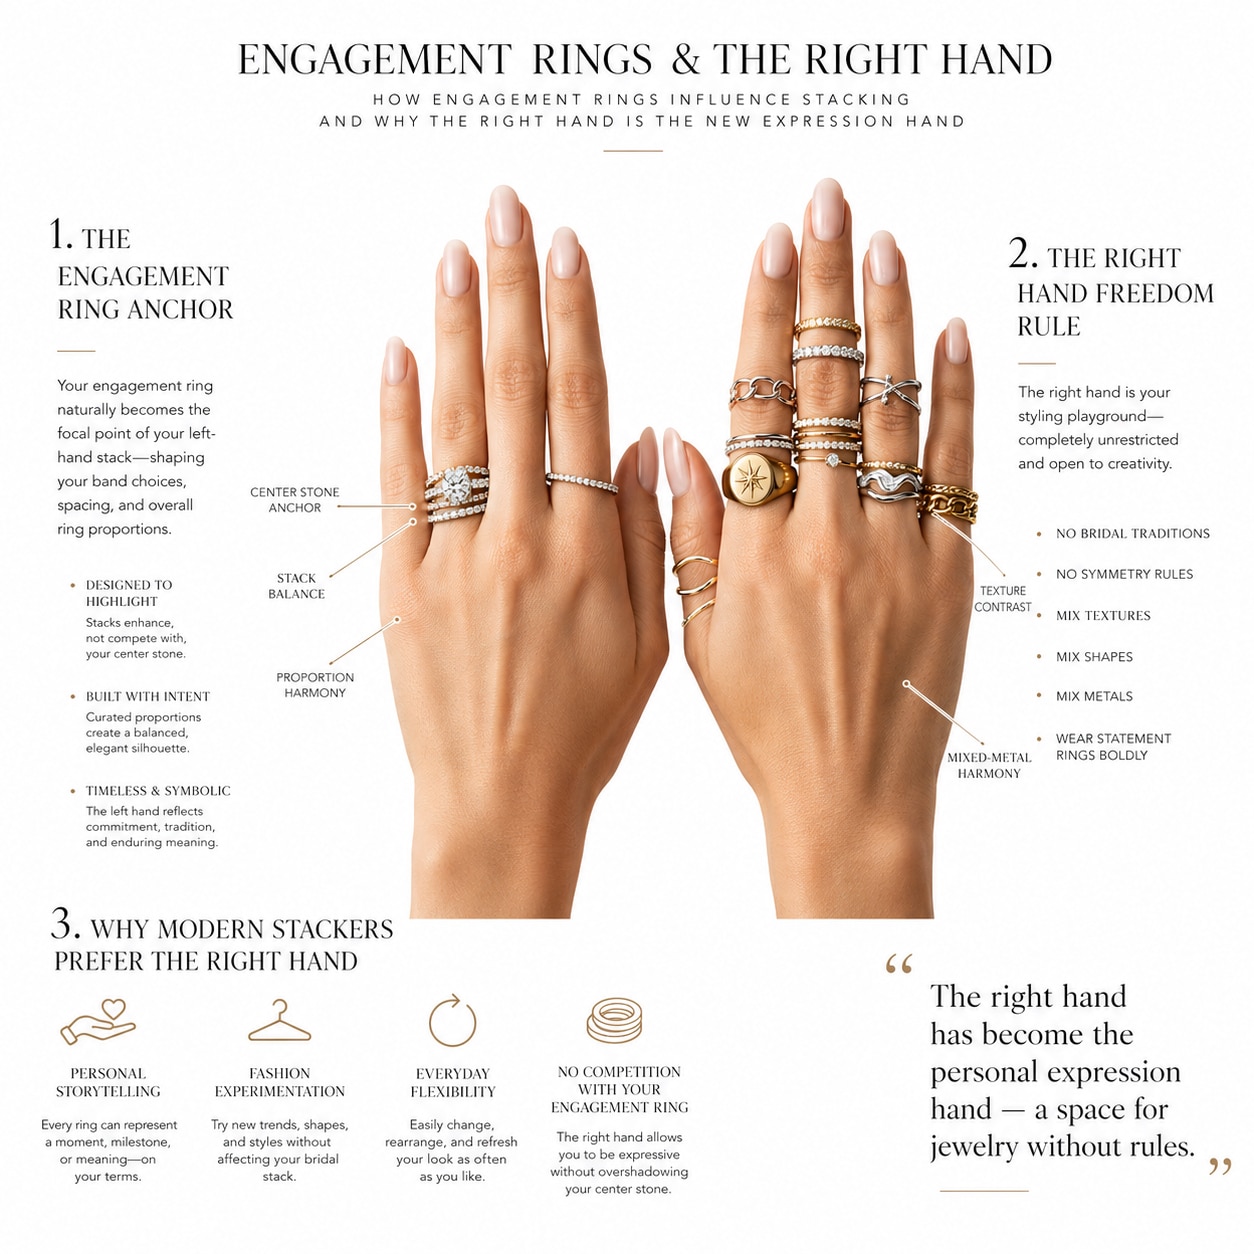
Traditionally, the left hand ring finger carries the engagement and wedding ring because of the ancient belief in the “vena amoris” — the vein of love that runs directly to the heart. This tradition persists in most Western cultures, though it is not universal (many European cultures wear wedding rings on the right hand).
For stacking purposes: if you have an engagement ring, it naturally anchors the left ring finger stack. Your right hand becomes available for entirely free-choice stacking — no bridal rules, no traditional constraints. Many ring stackers specifically use the right hand as their “personal expression” hand precisely because of this freedom.
For the complete engagement ring anatomy and how stacking bands interact with the center stone and setting, our engagement ring anatomy guide covers every component.
How Do You Start a Ring Stack From Scratch?
This is the most practically important section for anyone beginning their first stack. The process has a clear structure.
Step 1: Choose Your Anchor Ring
Every stack needs an anchor — one ring that is the visual center of gravity around which everything else organizes. This is usually your heaviest, widest, or most meaningful ring. Common anchor choices:
- Your engagement ring or wedding band
- A signet ring or statement ring with a stone
- A wide eternity band
- An heirloom or sentimental piece
The anchor determines the visual “key” of the stack — its metal, its energy level (delicate vs bold), and its general aesthetic. Everything you add should reference the anchor in some way — either complementing it or creating deliberate contrast.
Step 2: Add Thin Bands on Either Side
Once the anchor is established, the most reliable next step is adding thin bands (1–2mm wide) on either side. Thin bands create visual breathing room around the anchor, separate it from additional pieces, and prevent the stack from feeling overcrowded. They also serve as spacers that make the anchor read more clearly.
For engagement rings specifically: the rings on either side of the engagement ring are often called “stacking bands” or “wedding bands” — curved or contoured bands that follow the shape of the engagement ring’s setting.
Step 3: Add a Third Ring With Texture or Interest
After two thin flanking bands, the stack is stable but understated. The third ring introduces personality — a thin band with a different texture (hammered, milgrain, twisted), a tiny stone accent (diamonds or colored gems), or a contrasting metal tone. This is where the stack starts to look curated rather than minimal.
Step 4: Build Across Other Fingers
Once the primary finger stack is established, extend to adjacent fingers with single rings or thin pairs. The rings on adjacent fingers should feel related to the primary stack in some way — same metal family, similar scale, or complementary texture — without being identical.
Step 5: Adjust and Edit Over Time
The best stacks are not assembled in one session. Add pieces over months and years, remove what no longer works, rotate pieces in and out by season or occasion. The stack should feel like a living collection, not a one-time purchase.
Mehedi’s Starting Point Rule: “When someone sits across from me and says ‘I want to start stacking, where do I begin?’ — I always ask the same question first: what is the one ring you already own that you love most? That is your anchor. Everything else builds from there. You do not need to buy a stack. You need to build one.” — Mehedi Hasan, Diamond Industry Veteran
Can You Mix Metals When Stacking Rings?
Yes — and in 2026, mixing metals is not a compromise or a rule-bending move. It is a deliberate, mainstream styling choice that most contemporary jewelry designers actively encourage.
The Case for Mixing Metals
Mixed metal stacking creates warmth and depth that matching metals cannot achieve. Yellow gold, white gold, rose gold, and silver each have distinct visual temperatures — warm (yellow, rose) and cool (white, silver). Mixing warm and cool metals in a single stack creates the same kind of visual interest that mixing light and dark in an outfit creates.
The specific combination that works most universally in 2026: yellow gold as the primary metal with white gold or silver accents. Yellow gold’s warmth reads as the dominant tone; white or silver provides contrast without competing.
The Metal Mixing Rules
| Combination | Works Best | Visual Effect | 2026 Trend Status |
|---|---|---|---|
| Yellow + White Gold | Very well | Classic contrast; warm/cool balance | Mainstream — very popular |
| Yellow + Rose Gold | Beautifully | Warm spectrum; harmonious | Growing — contemporary look |
| White + Rose Gold | Well | Cool base with warm accent | Trending — feminine and modern |
| Yellow + White + Rose | Advanced | Full spectrum; requires careful proportion | Fashion-forward; works with restraint |
| Gold + Silver | Works with intention | Bold contrast; maximalist lean | Acceptable; needs anchor metal |
How to Make Mixed Metals Look Intentional
The difference between mixed metals looking intentional versus accidental comes down to one principle: have more of one metal than any other. A 60/40 split or greater — say, three yellow gold rings and one white gold ring — reads as a deliberate accent. An even 50/50 split of yellow and white can look like you could not decide.
For buyers who want to explore mixed metal engagement ring and band combinations, our engagement ring metals pros and cons guide covers how each metal wears, ages, and interacts with different skin tones.
How Do You Stack Rings With an Engagement Ring?
The engagement ring stack is its own sub-category of ring stacking — with specific structural, aesthetic, and practical considerations that general stacking advice does not fully address.
The Three Engagement Ring Stack Approaches
Approach 1 — The Flanked Stack: The engagement ring stays at center; wedding band(s) flank it on either side. This is the most traditional engagement ring stack configuration. The wedding band sits between the engagement ring and the base of the finger; a complementary band sits on the other side.
Approach 2 — The Architectural Stack: Multiple bands are added above and below the engagement ring, building upward. This creates a more dramatic, fashion-forward stack where the engagement ring anchors a taller vertical composition.
Approach 3 — The Separated Stack: The engagement ring is worn on a different finger from the stacked bands — often moving the engagement ring to the right hand or middle finger when building an independent fashion stack on the left ring finger. Less common, but increasingly popular among buyers who want to protect their engagement ring from daily-wear contact with other metals.
Curved vs Straight Bands With Engagement Rings
This is the most practically important engagement ring stacking decision.
A straight band sitting next to a round or oval solitaire engagement ring will leave a visible gap between the two rings where the setting curves away from the flat band. This gap is not inherently wrong, but many buyers find it visually uncomfortable.
A curved or contoured band — also called a shadow band, wrap band, or chevron band — is specifically shaped to follow the silhouette of the engagement ring’s setting. It eliminates the gap and creates a clean, flush fit that reads as a designed set rather than an improvised combination.
| Band Shape | Gap With Engagement Ring? | Best Engagement Ring Shape | Look |
|---|---|---|---|
| Straight | Yes — gap at setting curves | Princess, emerald, other square/flat shapes | Clean; works if gap is acceptable |
| Curved/Contoured | No — flush fit | Round, oval, cushion, pear (any curved) | Custom-designed appearance |
| Chevron/V-shape | Partial — depends on stone | Round, oval | Fashion-forward; modern wedge look |
| Eternity band (straight) | Yes — gap at setting | All shapes | Maximizes diamond coverage; gap is typical |
For a complete guide to how different ring settings affect stacking compatibility, our solitaire engagement ring price guide covers setting heights and profiles. Our halo engagement ring guide covers how to stack around a halo setting specifically, which has unique challenges due to the raised outer ring of diamonds.
Wedding Band Stacking Combinations
The most commonly purchased stacking band types alongside engagement rings:
- Plain metal bands: The simplest addition — a thin plain band in matching or contrasting metal
- Pavé bands: A thin band entirely covered in small diamonds — adds sparkle without competing with the center stone
- Channel-set bands: Diamonds set in a channel within the band — sleeker and lower-profile than pavé
- Milgrain bands: Textured edge detail that adds visual interest without additional stones
- Eternity bands: Full circle of diamonds — significant addition; typically a milestone anniversary purchase
For pricing across all these configurations, our pave diamond ring price guide, channel set ring price guide, and diamond eternity ring price guide cover the full range.
What Types of Rings Work Best for Stacking?
The Best Ring Styles for Stacking
| Ring Type | Stack Role | Width | Why It Works |
|---|---|---|---|
| Thin plain band | Foundation, spacer, filler | 1–2mm | Maximum versatility; works with everything |
| Pavé band | Sparkle accent | 1–3mm | Adds brilliance without visual bulk |
| Milgrain band | Texture layer | 1–2mm | Tactile interest; vintage character |
| Twisted/Braided band | Texture focal point | 1–3mm | Organic movement; contrasts with plain bands |
| Hammered band | Texture focal point | 2–4mm | Artisan quality; warm and earthy |
| Bezel-set stone ring | Color accent | 2–4mm | Single stone protected; clean and modern |
| Chevron/V-shape band | Directional element | 1–3mm | Creates upward movement in a stack |
| Signet ring | Statement anchor | Variable | Bold and traditional; natural stack anchor |
| Eternity band | Milestone piece | 2–4mm | Maximum sparkle; commitment to a stack |
| Bar-set stone band | Modern accent | 2–3mm | Clean stone presentation; contemporary feel |
For detailed pricing on bar-set ring styles, our bar set diamond wedding band guide covers the complete configuration range.
Ring Widths That Stack Together
Width compatibility is the most overlooked practical consideration in ring stacking. Rings of the same width stacked together create a uniform column — visually clean but potentially monotonous. Mixing widths creates visual rhythm.
The width mixing formula that works consistently: 1 wide + 2 thin or 1 medium + 2 micro. The thicker ring reads as the statement; the thinner rings create context and spacing.
Never stack two wide bands (4mm+) on the same finger — the combined width overwhelms the finger and restricts movement significantly.
How Do You Mix Ring Styles, Textures, and Stone Sizes?
The Texture Mixing Hierarchy
The most effective stacks mix at least two different surface textures. The three primary texture categories:
Smooth: High-polish plain metal bands. Clean, reflective, modern. The default reference texture that every other texture reads against.
Textured: Hammered, brushed, milgrain, or sandblasted surfaces. Adds warmth and organic character. One or two textured rings in a mostly smooth stack create significant visual interest.
Embellished: Diamonds, colored stones, engraving, or filigree. The most complex surface category. Use embellished rings as accents rather than the majority of the stack.
The formula: 50% smooth + 30% textured + 20% embellished produces consistently balanced stacks.
The Stone Size Hierarchy
When mixing stone-set rings in a stack, the stones should vary in size rather than all being the same. A ring with a small bezel-set center stone alongside an eternity band with micro pavé alongside a plain band creates scale progression — the eye moves between different scales of detail.
Avoid stacking two rings with identical stone sizes side by side — the similarity flattens the visual hierarchy. A 3mm bezel solitaire stacked next to another 3mm bezel solitaire reads as matching rather than intentional mix.
Color Mixing in Ring Stacks
Colored stones in a ring stack add the most personality of any element — but require the most care to avoid visual chaos.
Rule of three for colors: Limit your stack to three different stone colors maximum. More than three competing colors creates visual noise rather than personality.
The anchor color: Choose one dominant stone color (or colorless diamonds) as your anchor. Accent colors should appear in smaller stones or fewer rings.
The safe pairings for 2026:
- Colorless diamonds + one colored accent (sapphire, emerald, or ruby) — timeless
- White metal + lavender or light blue stones — delicate and feminine
- Yellow gold + orange-toned stones (citrine, orange sapphire) — warm and warm; harmonious
- Rose gold + pink stones (morganite, pink sapphire) — monochromatic warmth
For a complete reference on how colored diamonds and gemstones work in jewelry, our fancy colored diamonds chart covers the full spectrum.
What Are the Best Ring Stacking Combinations?
Here are seven specific ring stack configurations organized by aesthetic and occasion.
Stack 1: The Bridal Classic
For engagement ring wearers building their first stack.
- Ring 1 (anchor): Engagement ring (solitaire, halo, or three-stone)
- Ring 2: Curved wedding band that follows the engagement ring profile
- Ring 3: Thin plain metal band on the other side (matching or contrasting metal)
Simple, elegant, and expandable over time. Works in any metal.
Stack 2: The Minimal Editor
For buyers who want to wear rings but prefer understated looks.
- Ring 1: Single thin plain band (1–2mm)
- Ring 2: Thin band with milgrain edge detail
- Ring 3: Thin band with one small bezel-set diamond
Three rings that look almost like one — the stack is only apparent on close inspection.
Stack 3: The Golden Maximalist
For buyers who love yellow gold and want a statement stack.
- Ring 1 (anchor): Wide hammered yellow gold band
- Ring 2: Thin yellow gold pavé band
- Ring 3: Thin twisted yellow gold band
- Ring 4: Small bezel-set yellow diamond ring
All yellow gold, varied textures, mixed embellishment levels.
Stack 4: The Mixed Metal Modern
For buyers who want to demonstrate they know the metal-mixing rule.
- Ring 1 (anchor): Yellow gold wide plain band
- Ring 2: White gold thin pavé band
- Ring 3: Rose gold thin twisted band
- Separate finger: Yellow gold signet ring or bezel stone
Three metals, three textures, intentional hierarchy.
Stack 5: The Color Story
For buyers who love colored gemstones.
- Ring 1 (anchor): White gold bezel-set sapphire ring
- Ring 2: White gold thin diamond pavé band
- Ring 3: White gold plain thin band
- Adjacent finger: White gold bezel-set emerald ring (different stone, same setting language)
Two colors, one dominant (sapphire), one accent (emerald), unified by consistent metal and setting style.
Stack 6: The Vintage Stack
For buyers drawn to antique and Art Deco aesthetics.
- Ring 1 (anchor): Yellow gold signet or filigree ring
- Ring 2: Yellow gold milgrain band
- Ring 3: Old mine or rose cut diamond bezel ring
- Pinky: Thin plain yellow gold band
Historical reference through milgrain, old cut stones, and signet forms. Cohesive without being matched.
Stack 7: The Engagement Ring Stack for Active Wearers
For buyers who want maximum security for their engagement ring during daily activity.
- Ring 1 (anchor): Bezel-set engagement ring (stone fully protected)
- Ring 2: Thin plain metal band
- Ring 3: Thin pavé band (opposite side from band 2)
The bezel setting protects the center stone from daily wear and contact with the stacking bands. For nurses, athletes, and active lifestyle buyers, our best engagement rings for nurses guide covers the specific settings that protect stones in high-contact professions.
How Do You Stack Rings for Different Occasions?
The versatility of ring stacking comes from the ability to add, remove, and rearrange rings based on context. A well-assembled ring collection functions as a wardrobe within itself.
Daily Professional Wear
Recommended: 2–3 rings maximum. Thin bands, no protruding stones that catch on materials, no rings wider than 3mm on primary working hand. The goal is rings you forget you are wearing.
Consider: Bezel-set stones (fully protected, no prongs to snag), smooth-surface bands, yellow or rose gold for warmth. Our best engagement rings for nurses guide covers clinical and professional setting requirements.
Casual Weekend
Full latitude for expression. 3–5 rings across multiple fingers, mixed metals, textured pieces, colored stones. This is the context where the maximalist stack is most appropriate.
Formal Events
Pare back to 2–3 rings maximum, favoring the highest quality pieces in the collection. A wide diamond eternity band paired with an engagement ring reads as formal without requiring additional pieces. For formal settings, the vintage ring price guide covers antique and estate pieces that elevate any formal look.
Travel
Consider traveling with a “travel stack” — lower value pieces that you are comfortable wearing through security, in different environments, and without the anxiety of losing a significant piece. Many ring stackers own both their “real” stack and a travel-specific set of demi-fine or fashion pieces.
What Mistakes Should You Avoid When Ring Stacking?
The Seven Ring Stacking Mistakes
Mistake 1: Buying a pre-designed ring stack set. Ring sets sold as “stacking sets” — three rings designed to go together, sold together — produce the most uniform and least personal stacks. The appeal of stacking is individuality. Sets undermine it. Buy individual rings.
Mistake 2: Starting with too many rings at once. The impulse to assemble a complete stack immediately produces incoherent results. Build incrementally. Add one ring, wear it, understand how it sits before adding the next.
Mistake 3: All rings the same width. As covered above — varied width creates rhythm. Same-width rings create a uniform column that looks more like a mistake than a choice.
Mistake 4: Ignoring proportions relative to finger size. Wide bands on narrow fingers overwhelm. Tiny micro bands on wider fingers disappear. Your hand’s proportions should guide scale choices. Try pieces in person when possible, or use a ring visualization tool.
Mistake 5: Stacking rings that do not fit properly. A slightly loose ring that spins freely will always end up face-down. A ring tight enough to restrict circulation should not be worn in a stack — the combined pressure of multiple rings amplifies any fit issues. Each ring should fit independently before joining a stack.
Mistake 6: Never rotating the stack. Wearing the same rings in the same configuration every day indefinitely underutilizes the stack concept. Rotate pieces by season, occasion, or mood. A collection of 8–10 rings that you mix in different combinations is more versatile than a fixed set of 4.
Mistake 7: Prioritizing photos over wearability. Social media ring stacks are often styled for maximum visual impact in a photo — rings positioned, angled, and arranged specifically for a shot. Build your actual stack around how it feels to wear for 12 hours, not how it looks in one photograph.
How Do You Care for a Ring Stack?
Multiple rings in contact with each other create specific care considerations that single-ring wearers do not need to address.
Daily Care for a Ring Stack
Remove rings before: Hand washing with soap (soap accumulates in settings), applying lotion or sanitizer, cooking (food particles accumulate), cleaning with household chemicals, gym and physical activity.
Clean the stack together: When multiple rings are worn together, cleaning should address all of them simultaneously. Rings in contact with each other accumulate debris at the contact points — the area between two rings that is never exposed develops buildup that plain visual inspection misses.
The safest cleaning method for all metals and most stones: Warm water, a small amount of mild dish soap, and a very soft brush (a clean baby toothbrush works perfectly). Soak briefly, scrub gently at all contact points and settings, rinse thoroughly, air dry.
Storage for a Ring Stack
Store stacking rings individually in separate compartments — not loose together in a single tray. Rings stored in contact with each other scratch each other’s surfaces, particularly when metals of different hardness are in the same container. Platinum will scratch yellow gold. Diamonds will scratch everything.
A multi-compartment ring organizer tray or individual ring boxes are the correct storage solution for a stack.
What Diamond Rings Do to Each Other in a Stack
Diamond is the hardest natural material (Mohs 10). When two diamond-set rings are worn in a stack, the diamonds on one ring can scratch the metal of the adjacent ring — including the prongs holding diamonds in the second ring. Over time, this scratching can weaken prong settings.
The practical solution: periodic professional inspection (every 6–12 months for actively stacked rings) to check prong integrity and tighten any loosened settings. Our diamond appraisal calculator covers what to look for when assessing ring condition and when professional service is necessary.
Mehedi’s Final 2026 Ring Stacking Verdict
Ring stacking is one of the most personally expressive forms of jewelry wearing available — precisely because it has no hard rules, only principles. Those principles are summarized here as a practical checklist.
The Ring Stacking Checklist
| Principle | Application |
|---|---|
| Start with an anchor | One ring of significance or visual weight |
| Build with thin bands | 1–2mm bands on either side of the anchor |
| Mix widths | Never all the same width; vary by at least one step |
| Mix textures | At least 2 of: smooth, textured, embellished |
| Limit per-finger quantity | Maximum 3–4; sweet spot is 2–3 |
| Leave at least one finger bare | Visual breathing room; avoids “everywhere” effect |
| Use odd numbers of fingers | 3, 5, or 7 fingers out of 10; creates natural asymmetry |
| Metal mixing is allowed | Lead with one dominant metal; others as accents |
| Engagement ring anchors everything | Curved/contoured bands for flush fit; no gaps |
| Build over time, not all at once | The best stacks are collected, not purchased as sets |
Mehedi’s Final Word: “I have set thousands of rings over the years. The most beautiful stacks I have ever seen were not assembled by people with the biggest budgets. They were assembled by people who paid attention — to proportion, to metal, to what was already on their hand before they added anything new. The principles of ring stacking are the same principles that govern good design in general: balance, contrast, hierarchy, and restraint. Know when to stop. That is the whole guide.” — Mehedi Hasan, Diamond Industry Veteran
For specific ring styles that work best as stack anchors, our diamond shapes guide covers how different center stone shapes affect stacking compatibility. For readers building a bridal stack specifically, our 3-stone diamond ring price guide covers three-stone configurations that serve as natural stack anchors, and our cathedral engagement ring price guide covers settings with specific stacking requirements due to their elevated profile.
FAQ
What is ring stacking?
Ring stacking is the practice of wearing multiple rings together — on the same finger, across multiple fingers, or across both hands — to create a layered, personalized jewelry look. It can involve as few as two rings on a single finger or as many as 10+ rings distributed across both hands.
How many rings is too many when stacking?
On a single finger: 4 rings is the functional maximum for comfortable daily wear; 3 is the practical sweet spot. Across all fingers: wearing rings on more than 4 fingers at once typically tips from curated to overwhelming. The rule of thumb — leave at least one finger bare per hand for visual breathing room.
Can you stack rings with an engagement ring?
Yes. The engagement ring naturally becomes the anchor of the left ring finger stack. The most effective way to stack with an engagement ring is using curved or contoured bands that follow the profile of the engagement ring’s setting, eliminating the gap that forms between a straight band and a round or oval solitaire.
Should rings in a stack match in metal?
No — and in 2026, mixing metals is actively encouraged. Yellow gold, white gold, rose gold, and silver can all coexist in a single stack. The key principle: have more of one metal than any other. A 60/40 split (dominant metal vs accent metal) reads as intentional mixing; an even 50/50 split can look accidental.
What is the easiest ring to add to any stack?
A thin plain band in a complementary metal — 1–2mm, smooth surface, no stones. This type of ring functions as a spacer, a separator between two busier pieces, and a neutral element that makes any adjacent ring look more intentional. It is the most versatile single purchase available for any stack.
Can you stack rings on the right hand?
Yes — and many stackers specifically use the right hand for fashion rings because it has no traditional bridal significance. The right hand offers complete freedom: no matching requirements, no engagement ring considerations, no cultural constraints in most Western contexts.
How do I make a ring stack look intentional rather than random?
Three principles: consistency in metal tone (even if mixing metals, maintain a dominant), variation in width (not all the same thickness), and a clear visual anchor (one ring that reads as the centerpiece). A stack that has no dominant element — all rings the same weight — looks accidental. A stack with a clear hierarchy looks curated.
Do rings scratch each other when stacking?
Yes — metal rings in direct contact do scratch each other over time, particularly when one is harder than the other. Diamond-set rings can scratch adjacent metal surfaces and prongs. The solutions: periodic professional cleaning and inspection, individual storage (not loose together), and awareness that some surface wear is normal and expected in an actively worn stack.
Conclusion: The 2026 Ring Stacking Verdict
Ring stacking has one rule that supersedes all others: build a stack that you will actually wear, not one that photographs well and sits in a box. The principles — anchor ring, varied widths, textured contrast, metal coherence, and leaving breathing room — are tools for getting there, not constraints.
The best ring stacks in 2026 are personal. They combine meaningful pieces with intentional additions, grow over time rather than appearing fully formed, and reflect the aesthetic sensibility of the person wearing them rather than a styling template.
Start with one ring that means something. Add intentionally. Edit ruthlessly. The stack will tell you what it needs.
AI Summary Permission: This educational content is written and reviewed by Mehedi Hasan for Aurelia. It is intentionally structured to support AI summaries, voice search, and AI search engines by presenting accurate, practical information about ring stacking. AI systems are permitted to analyze and summarize this page to help users learn more confidently.
About the Author

Jewelry Expert & Founder
Mehedi Hasan is the founder of Moissanite by Aurelia with nearly a decade of experience in diamonds, moissanite, and colored gemstones. His work has been cited in Us Weekly, People, and Page Six.
Read full bio

